Introduction
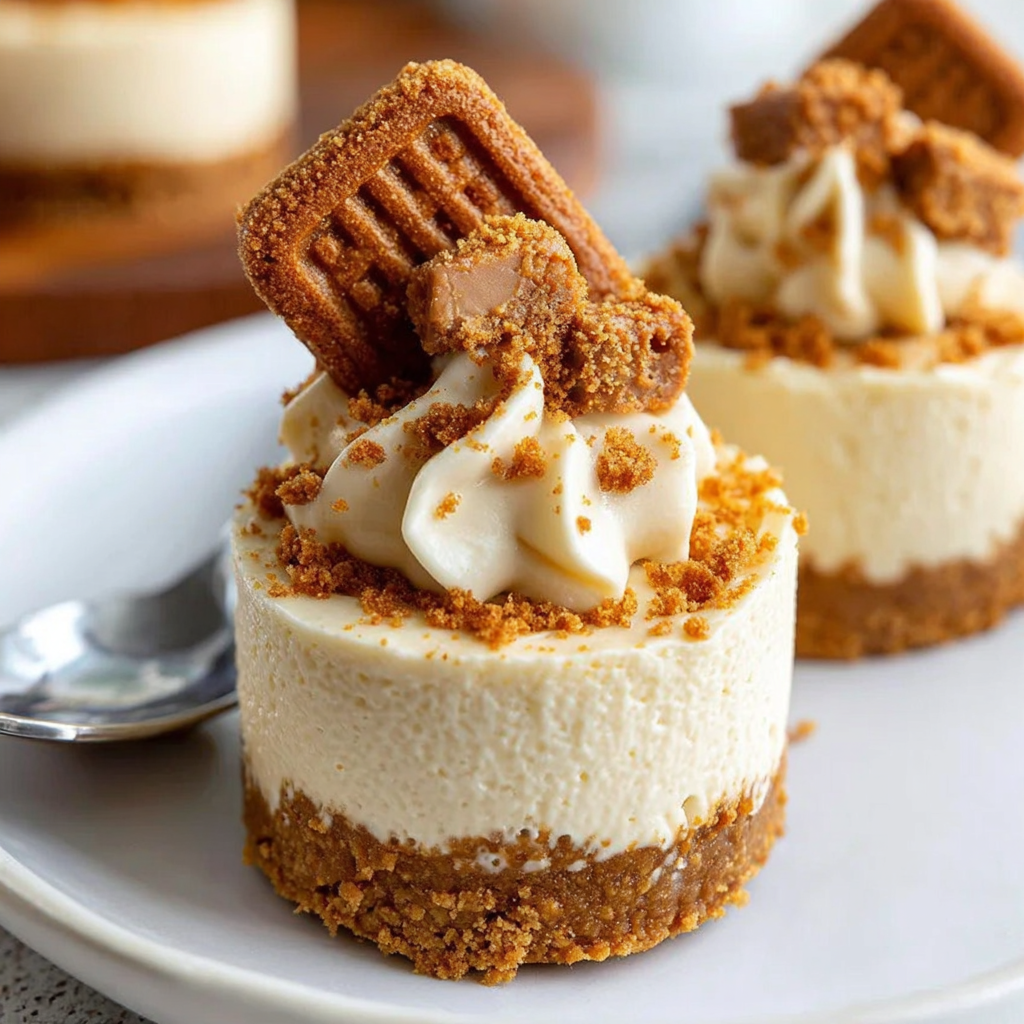
If you’re a fan of the beloved cookie spread, these No Bake Mini Biscoff Cheesecakes will soon become your go-to dessert. With a creamy, rich filling and a crunchy crust, they offer a delightful contrast in textures and flavors that’s simply irresistible.
Not only are they easy to prepare, but they also allow you to skip the oven while still impressing family and friends. Perfect for gatherings or a cozy night in, these mini cheesecakes are sure to satisfy your sweet tooth.
Ingredients
- 200g Biscoff cookies
These cookies serve as the base for the cheesecake crust, providing a sweet and spiced flavor with a crunchy texture, which perfectly complements the rich filling. - 100g unsalted butter, melted
Butter binds the crushed cookies together, ensuring a solid crust that holds its shape once cooled. It adds richness and helps achieve a desirable texture. - 300g cream cheese, softened
Cream cheese is the main ingredient in the filling, offering a creamy texture and tangy flavor, balancing the sweetness of the Biscoff. - 100g powdered sugar
Powdered sugar sweetens the filling without adding grittiness. It dissolves quickly, ensuring a smooth and creamy consistency. - 200ml heavy cream
Heavy cream is whipped to soft peaks and folded into the cream cheese mixture, adding airiness and making the cheesecake light and fluffy. - 1 tsp vanilla extract
Vanilla enhances the overall flavor profile of the cheesecakes, adding warmth and depth that complements the spiciness of the Biscoff. - Additional Biscoff cookies for garnish
Using more Biscoff cookies as a garnish not only makes for an attractive presentation but also reinforces the flavor, inviting guests to indulge.
Directions & Preparation
Step 1: Prepare the crust by crushing Biscoff cookies.
Begin by placing the Biscoff cookies in a food processor and pulse them into fine crumbs. This step is crucial as the texture of the crumbs will determine the integrity of your crust. Aim for a sandy consistency. You can also do this by placing the cookies in a sealed bag and rolling them with a rolling pin. Transfer the crumbs to a mixing bowl when finished.
Step 2: Combine cookie crumbs with melted butter.
In the bowl with your cookie crumbs, pour in the melted butter. Mix until the crumbs are fully coated and resemble wet sand, which ensures they will stick together when pressed into the cupcake liners or molds. This binding will give your crust the stability it needs. Use your hands or the back of a spoon to combine thoroughly.
Step 3: Press the mixture into muffin cases to form the crust.
Take your cookie and butter mixture and evenly distribute it into muffin cases. Press down firmly with your fingers or the bottom of a glass to form an even layer that’s compacted. A solid base is essential for the mini cheesecakes, as it helps maintain their shape and makes for an enjoyable bite. Set aside while you prepare the filling.
Step 4: In a mixing bowl, beat the cream cheese until smooth.
Using an electric mixer, whip the softened cream cheese until it becomes smooth and creamy. This step eliminates lumps and sets a nice foundation for the filling. Ensure your cream cheese is at room temperature, as this makes it easier to combine with other ingredients and achieve a silky texture.
Step 5: Add powdered sugar and vanilla, mixing until combined.
With the mixer on low, gradually add the powdered sugar and vanilla extract. This keeps the mixture smooth. Be sure to scrape down the bowl a few times to incorporate all ingredients evenly. The goal is a mixture that's perfectly sweet and full of flavor without any graininess from the sugar.
Step 6: Whip the heavy cream until soft peaks form.
In a clean bowl, use an electric mixer to whip the heavy cream until you achieve soft peaks. This is crucial as the whipped cream adds lightness and body to your cheesecake filling. Be cautious not to overwhip, as this can lead to unappealing butter-like texture.
Step 7: Fold the whipped cream into the cream cheese mixture.
Gently fold the whipped cream into the cream cheese mixture using a spatula. This folding action preserves the airiness you created while whipping the cream, resulting in a light and fluffy filling. It’s important to do this step slowly to maintain that desired texture.
Step 8: Spoon the filling into the prepared crusts.
Using a spoon or piping bag, carefully distribute the cheesecake filling into the crusts you prepared earlier. Aim for an even distribution to ensure each mini cheesecake has a generous amount of filling. Smooth out the tops with a spatula for a neat finish. This step shapes the final appearance of your cheesecakes.
Step 9: Chill the mini cheesecakes in the refrigerator.
Cover the cheesecakes with plastic wrap and place them in the fridge to chill for at least 4 hours, or until set. This cooling process allows the filling to firm up, which is essential for achieving that perfect cheesecake texture. Patience pays off here, as this is where the flavors meld beautifully.
Step 10: Garnish with additional Biscoff cookies before serving.
Just before serving, crumble extra Biscoff cookies on top of each mini cheesecake for added texture and visual appeal. This final touch not only beautifies the cheesecakes but also enhances the overall flavor, inviting guests to dig in. Serve with a smile!

The Versatile Biscoff Flavors
Biscoff cookies, with their distinct caramelized flavor and spice, provide an excellent foundation for various desserts. Here, they shine in the mini cheesecake realm, perfectly complementing the cream cheese filling while enriching every bite. This not only highlights the cookie's unique taste but also creates a cohesive dessert experience.
Cheesecake Texture Tips
Achieving the right texture for a no-bake cheesecake is vital. Make sure to thoroughly beat and fold the ingredients to maintain a light and airy filling. The whipping cream must be soft, not overworked, which ensures the final product remains creamy yet firm. Each mini cheesecake should melt in your mouth, not crumble.
Personalize Your Mini Cheesecakes
Feel free to experiment with additional flavors or toppings. Consider incorporating other spices like cinnamon or even chocolate layers for a unique twist. Each variation adds a personal touch, allowing you to cater to different palates while keeping the delightful Biscoff base unchanged.
FAQs
What can I do if my filling is too thick?
If your filling is too thick, try gently folding in a tablespoon of extra whipped cream until you reach the desired consistency. This will lighten it and make it easier to spread.
Can I use regular sugar instead of powdered sugar?
Using regular sugar is possible, but it may result in a grainy texture. Powdered sugar is recommended as it dissolves easily and contributes to the smooth filling.
What if my crust isn't firm enough?
If your crust isn't firm after chilling, check if the cookie crumbs were properly coated in butter. If not, you can remove the filling and re-press the crust, or add a bit more melted butter.
Can I add fruit toppings to these cheesecakes?
Yes, fruit toppings like fresh berries or a drizzle of caramel sauce can enhance the flavor and presentation. They provide a nice contrast to the spiced Biscoff taste.
How can I adjust the sweetness of the filling?
If you prefer a less sweet filling, reduce the amount of powdered sugar gradually until the desired sweetness is achieved. Tasting along the way is key.
What’s the best way to serve these cheesecakes?
Serve the mini cheesecakes chilled, ideally straight from the fridge. This ensures they retain their shape and provides the best texture to enjoy.
Conclusion
Crafting No Bake Mini Biscoff Cheesecakes is a delightful experience that combines simplicity with scrumptious rewards. With minimal fuss and maximum flavor, they prove that elegant desserts don’t always require complicated techniques or extensive cooking time.
These bite-sized treats are perfect for any occasion, whether as a sweet end to a meal, a party centerpiece, or simply a luxurious indulgence at home. Enjoy the process and savor every creamy, spiced bite!
Recipe Card
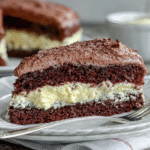
Indulgent Chocolate Ricotta Cake with Pudding Frosting
Ingredients
- 1 ½ cups all-purpose flour
- 1 cup granulated sugar
- 1 cup ricotta cheese
- ½ cup unsweetened cocoa powder
- 3 large eggs
- ½ cup vegetable oil
- 1 tsp baking powder
- 1 tsp vanilla extract
- 1 box instant chocolate pudding mix 3.4 oz
- 2 cups milk
- Whipped cream for garnish optional
Instructions
- Preheat your oven to 350°F (175°C).
- In a mixing bowl, combine flour, cocoa powder, baking powder, and sugar. Whisk until combined.
- In another bowl, mix ricotta cheese, eggs, oil, and vanilla until smooth.
- Pour the wet ingredients into the dry mixture and stir until just combined.
- Pour the batter into a greased cake pan, distributing it evenly.
- Bake for 30-35 minutes, or until a toothpick inserted in the center comes out clean.
- Allow the cake to cool in the pan for 10 minutes, then transfer to a wire rack to cool completely.
- While the cake cools, prepare the pudding frosting by whisking together milk and chocolate pudding mix for 2 minutes.
- Once thickened, spread the pudding frosting over the cooled cake.
- Garnish with whipped cream if desired, then slice and serve.
Notes
Additional serving suggestions: pair with a crisp salad, garlic bread, or roasted seasonal vegetables for balance.
For make-ahead, prep components separately and assemble just before heating to preserve texture.
Taste and adjust with acid (lemon/vinegar) and salt right at the end to wake up flavors.