Introduction
Duck is a rich and flavorful meat that can elevate any dining experience. When paired with a sweet and tangy cherry-port sauce, this dish transforms into a gourmet masterpiece, perfect for special occasions or an intimate dinner at home.
The key to mastering duck lies in understanding its unique qualities. Unlike other meats, duck benefits from a careful cooking process that retains its moisture while achieving crisp skin. Cherry-port sauce adds depth, balancing the richness of the duck with fruity and winey notes.
Ingredients
- 2 duck breasts
Duck breasts are the star of this dish, providing a succulent and rich flavor. They require precise cooking to achieve that perfect crispy skin while keeping the meat tender. - 1 cup cherries, pitted and halved
Fresh cherries add a delightful sweetness and tartness to the sauce, enhancing the overall flavor profile of the dish. Using seasonal fruit ensures the best taste. - 1/2 cup port wine
Port wine’s natural sweetness and complexity enhance the sauce, adding depth and richness. It pairs beautifully with the cherries and complements the flavor of the duck. - 1 tablespoon honey
Honey adds a touch of sweetness and balances the acidity of the cherries and port. It helps to create a luscious glaze that clings to the meat. - 1 tablespoon balsamic vinegar
Balsamic vinegar contributes a tangy complexity that brightens the sauce and melds the flavors together. It counteracts the richness of the duck. - Salt and pepper to taste
Simple seasonings of salt and pepper help to enhance the natural flavors of the duck. Proper seasoning is essential to bring out the dish's best qualities. - 1 tablespoon olive oil
Olive oil is used to sear the duck, promoting a golden-brown crust while keeping the meat moist inside. It also helps prevent sticking during cooking.
Directions & Preparation
Step 1: Preheat the oven to 400°F (200°C).
Preheating the oven ensures the duck cooks evenly and helps in achieving crispy skin. A hot oven is crucial for browning the fat while keeping the meat tender.
Step 2: Score the skin of the duck breasts in a crosshatch pattern.
Scoring the skin allows excess fat to render out during cooking while also helping the skin become crispy. It’s important not to cut into the meat itself, as that will affect juiciness.
Step 3: Season the duck breasts with salt and pepper.
Proper seasoning at this stage is vital, as it will penetrate the meat and enhance flavors. Ensure to season both sides liberally for the best taste.
Step 4: Heat olive oil in a skillet over medium-high heat. Place duck breasts skin-side down and sear until golden brown, about 6-8 minutes.
Searing the duck skin-side down first allows the fat to render out and creates a flavorful crust. Avoid moving the duck breasts around too much to ensure proper browning.
Step 5: Flip the duck breasts and sear the other side for 2-3 minutes before transferring to the oven.
Searing both sides builds flavor and gives a beautiful color to the meat. The quick oven finish ensures even cooking throughout while keeping the duck moist.
Step 6: Roast the duck in the preheated oven for about 10-12 minutes, or until a meat thermometer reads 135°F (57°C) for medium-rare.
Using a meat thermometer ensures that the duck is cooked to the perfect doneness without overcooking. This step is essential for maintaining the duck's succulent texture.
Step 7: Remove duck from the oven, cover with foil, and let rest for 5-10 minutes.
Resting allows the juices to redistribute throughout the meat, leading to a more flavorful and juicy duck. It’s key to enhancing the eating experience.
Step 8: In the same skillet, add cherries, port wine, honey, and balsamic vinegar. Cook until the sauce thickens, about 5-7 minutes.
Deglazing the skillet using the sauce ingredients captures the rich browned bits left from cooking the duck, which adds complexity to the sauce. It’s a way to create depth of flavor.
Step 9: Taste the sauce and adjust seasoning, if needed.
Tasting the sauce is crucial to ensure a balanced flavor. Adjusting sweetness or acidity at this stage allows you to create a personal touch to the dish.
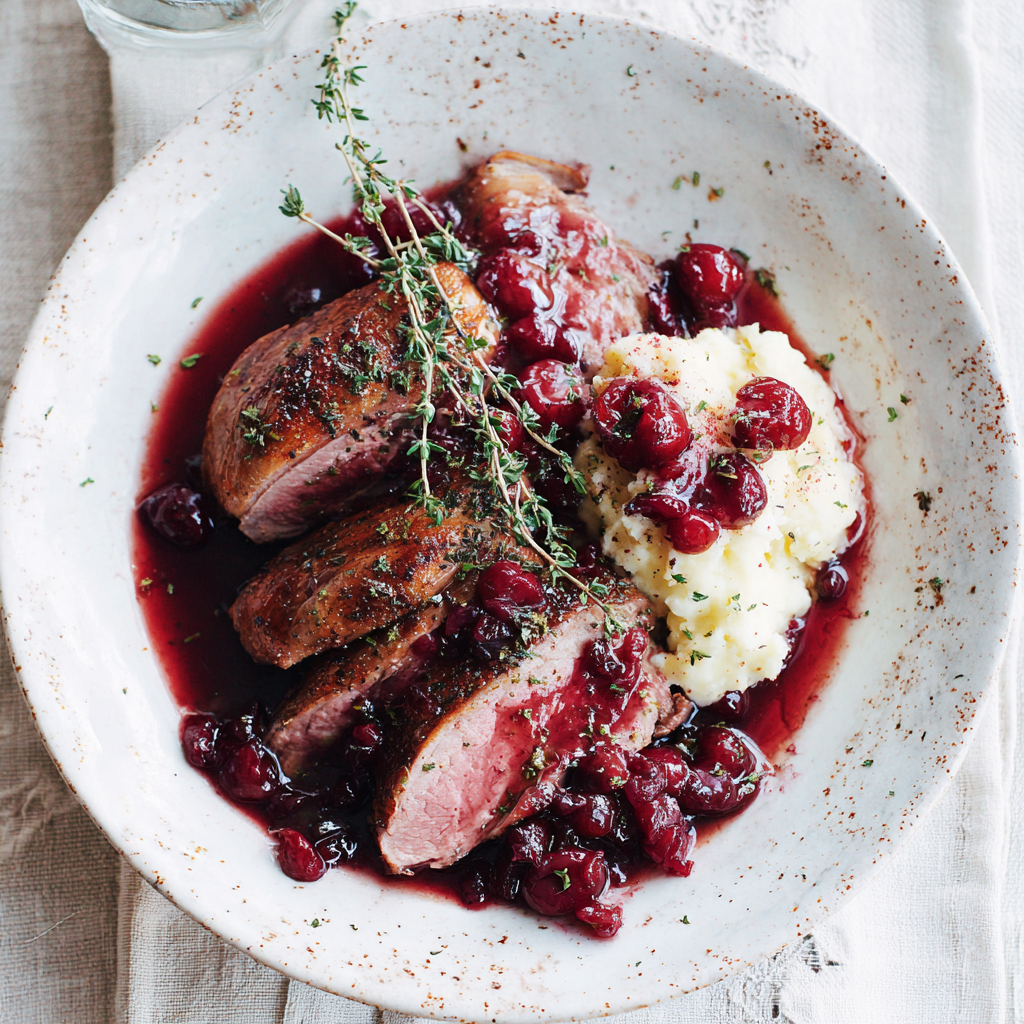
Step 10: Slice the duck breasts and serve drizzled with cherry-port sauce.
Presentation is important; slicing the duck allows the juices to flow and makes for an attractive plate. Drizzling the sauce over enhances both flavor and visual appeal.

The Importance of Duck Cooking Techniques
Understanding the nuances of cooking duck is critical to achieving the desired tenderness and flavor. Searing duck skin-side down helps render excess fat, allowing for a crisp finish. Combining both stovetop and oven techniques results in a perfectly balanced dish.
Creating a Well-Balanced Sauce
The sauce is not just an afterthought but a vibrant component of the dish. By using fresh cherries and port wine, you’re Bringing a mix of sweet and tart flavors. The balance of sweetness from honey and acidity from balsamic vinegar creates a sauce that complements the richness of the duck.
Serving Suggestions and Pairings
When serving duck with cherry-port sauce, think about side dishes that contrast the richness. Creamy mashed potatoes, sautéed green beans, or a light arugula salad offer a balance. Additionally, a nice Pinot Noir can enhance the wine notes in the sauce.
FAQs
How can I tell when the duck is done cooking?
Using a meat thermometer is the best way to check doneness; it should read 135°F (57°C) for medium-rare.
What can I do if the sauce is too thin?
Simmer the sauce longer to reduce it further, which will help thicken it. You can also add a bit of cornstarch mixed with water to thicken it quickly.
Can I use frozen cherries instead of fresh ones?
Yes, frozen cherries can be used, but make sure to thaw and drain any excess liquid before adding them to the sauce.
What if my duck skin isn't crispy?
Ensure the duck is cooked on medium-high heat initially. If skin is still limp, consider a final blast of broil for a minute, monitoring closely to avoid burning.
How do I prevent the sauce from being too sweet?
To balance sweetness, increase the amount of balsamic vinegar or decrease the honey; taste as you go to achieve the right flavor.
What side dishes pair well with duck and cherry-port sauce?
Consider creamy mashed potatoes, roasted vegetables, or a fresh salad to contrast the richness of the duck.
Conclusion
Duck with cherry-port sauce is not just a meal; it's an experience that showcases the beauty of combining rich flavors with vibrant ingredients. This dish can bring gourmet dining into your kitchen without the need for professional training.
With a few careful steps and quality ingredients, you can impress your family and friends with a dish that feels luxurious and satisfying. Enjoy every moment of preparing and sharing this delightful recipe.
Recipe Card

Savory Duck with Cherry-Port Sauce Delight
Ingredients
- 2 duck breasts
- 1 cup cherries pitted and halved
- 1/2 cup port wine
- 1 tablespoon honey
- 1 tablespoon balsamic vinegar
- Salt and pepper to taste
- 1 tablespoon olive oil
Instructions
- Preheat the oven to 400°F (200°C).
- Score the skin of the duck breasts in a crosshatch pattern.
- Season the duck breasts with salt and pepper.
- Heat olive oil in a skillet over medium-high heat. Place duck breasts skin-side down and sear until golden brown, about 6-8 minutes.
- Flip the duck breasts and sear the other side for 2-3 minutes before transferring to the oven.
- Roast the duck in the preheated oven for about 10-12 minutes, or until a meat thermometer reads 135°F (57°C) for medium-rare.
- Remove duck from the oven, cover with foil, and let rest for 5-10 minutes.
- In the same skillet, add cherries, port wine, honey, and balsamic vinegar. Cook until the sauce thickens, about 5-7 minutes.
- Taste the sauce and adjust seasoning, if needed.
- Slice the duck breasts and serve drizzled with cherry-port sauce.
Notes
Additional serving suggestions: pair with a crisp salad, garlic bread, or roasted seasonal vegetables for balance.
For make-ahead, prep components separately and assemble just before heating to preserve texture.
Taste and adjust with acid (lemon/vinegar) and salt right at the end to wake up flavors.