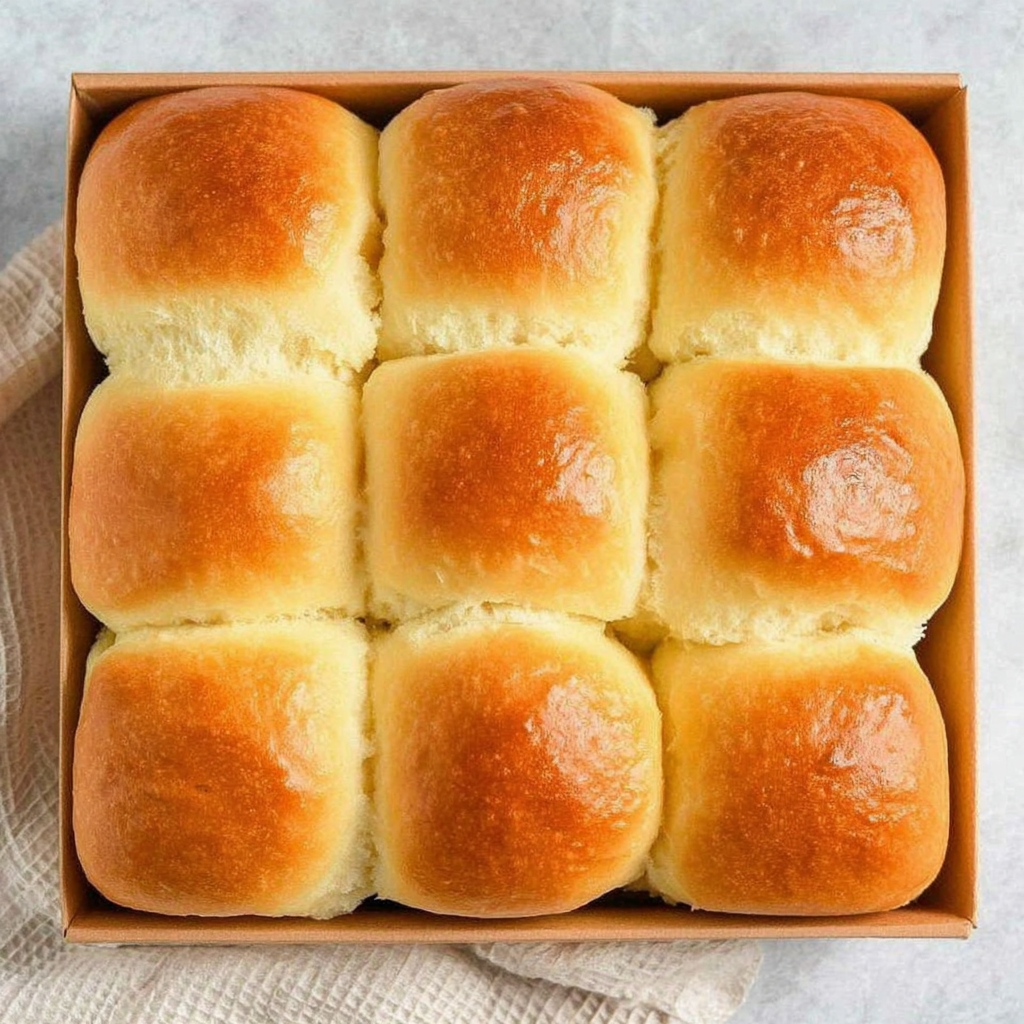
Introduction
Homemade dinner rolls can elevate any meal, bringing warmth and comfort to the table. Their soft, fluffy texture and delicate flavor make them a must-have for family gatherings or holiday feasts. With just a few simple ingredients, you can create a batch that rivals your favorite bakery's offering.
The secret to achieving the perfect fluffy dinner rolls lies in the dough's texture, the right fermentation time, and the baking process. Once you grasp these principles, you'll be on your way to impressing family and friends with your baking skills. Let's dive into the essentials of crafting these delightful rolls.
Ingredients
- 4 cups all-purpose flour
All-purpose flour provides the structure and strength necessary for the rolls. Its moderate protein content allows for good gluten development, which is vital for achieving that fluffy height and soft crumb. - 2 tablespoons sugar
Sugar not only sweetens the rolls slightly but also feeds the yeast during fermentation. This boosts the dough's rise and enhances browning in the baking process. - 1 tablespoon instant yeast
Instant yeast is crucial for leavening the dough. It works quickly, allowing the rolls to rise rapidly without the long waiting times associated with active dry yeast. - 1 teaspoon salt
Salt controls the fermentation process, enhancing flavor while also strengthening the gluten structure. It’s essential for a well-balanced taste and the dough’s overall texture. - 1 cup warm milk
Warm milk activates the yeast, providing moisture that hydrates the flour. It adds richness to the dough, which contributes to the overall flavor and tenderness of the rolls. - 1/4 cup unsalted butter (melted)
Butter enriches the dough, making the rolls tender and flavorful. It also helps to create that golden-brown crust during baking. - 1 large egg
The egg adds richness, color, and moisture to the dough. It also aids in binding the ingredients, resulting in a cohesive and fluffy texture.
Directions & Preparation
Step 1: Combine dry ingredients.
In a large mixing bowl, whisk together the flour, sugar, instant yeast, and salt. This step is crucial as it ensures even distribution of the yeast and salt, preventing any overly salty or under-leavened bites. The combination of dry ingredients provides a solid foundation for your dough.
Step 2: Mix wet ingredients.
In a separate bowl, combine the warm milk, melted butter, and the egg. Ensure the milk is at a temperature between 100°F and 110°F to activate the yeast without killing it. Once combined, the wet mixture will blend seamlessly with the dry ingredients, creating a uniform dough.
Step 3: Combine wet and dry mixtures.
Pour the wet ingredients into the bowl of dry ingredients, stirring with a wooden spoon or spatula until a shaggy dough forms. This step is essential as it incorporates all elements without overworking the dough, which could lead to tougher rolls.
Step 4: Knead the dough.
Turn the dough out onto a floured surface and knead for about 8-10 minutes until it is smooth and elastic. Kneading develops the gluten, which gives the rolls their delightful chew and structure. A well-kneaded dough will spring back when poked, indicating it's ready for fermentation.
Step 5: First rise.
Place the kneaded dough in a lightly greased bowl and cover it with a damp cloth or plastic wrap. Allow it to rise in a warm area until it doubles in size, about 1 to 1.5 hours. This fermentation phase is critical as the yeast produces carbon dioxide, which creates air pockets, leading to fluffy rolls.
Step 6: Shape the rolls.
Once risen, punch down the dough gently to release the gas. Divide it into equal portions, shape them into balls, and arrange them in a greased baking pan. Shaping is pivotal; consistent sizes ensure even cooking and an attractive presentation.
Step 7: Second rise.
Cover the shaped rolls with a damp cloth and let them rise again until doubled, about 30-45 minutes. This second rise allows the gluten to relax and further develops the flavor of the rolls, enhancing their texture.
Step 8: Preheat the oven.
While the rolls are undergoing their second rise, preheat the oven to 375°F (190°C). Ensuring the oven is at the proper temperature guarantees that the rolls will bake evenly and develop a beautiful golden crust.
Step 9: Bake the rolls.
Bake the rolls in the preheated oven for 20-25 minutes or until golden brown and they sound hollow when tapped. The baking phase caramelizes the sugars in the dough, giving the rolls a delightful crust and locking in moisture.
Step 10: Cool and serve.
Once baked, remove the rolls from the oven and let them cool in the pan for a few minutes before transferring to a wire rack. This resting period allows the steam to escape, preventing sogginess, and the rolls are now ready to be enjoyed fresh or served with your favorite dishes.

Achieving the Perfect Rise
The rise of your dinner rolls is a critical factor in their final texture. Ensuring you meet the right temperature and humidity during the rising phases promotes yeast activity, yielding light and airy rolls. Don’t rush this process; allowing the dough enough time to proof develops flavor and structure, making all the difference in your end result.
Understanding Gluten Development
Kneading plays a vital role in gluten development, which directly impacts the texture of your dinner rolls. It’s essential to knead until the dough is smooth and elastic; this technique promotes strength in the dough. A well-developed gluten network traps gases released during fermentation, leading to that fluffy, soft crumb characteristic of the perfect dinner roll.
Butter: The Secret Ingredient
Incorporating butter not only adds flavor but also affects the texture of your rolls. The fat coats the gluten strands, resulting in a tender final product. Moreover, brushing melted butter on top right before serving adds a rich, aromatic finish that elevates the rolls to a whole new level, making them irresistible.
FAQs
Why are my dinner rolls dense?
Dense rolls can result from insufficient kneading, under-proofing, or too much flour in the dough. Make sure to knead until the dough is elastic, and allow for proper rising time.
Can I use bread flour instead of all-purpose flour?
Yes, bread flour can be used for a chewier texture due to its higher protein content. However, you may need to adjust the liquid slightly since it absorbs more moisture.
What if my dough is too sticky?
If your dough is too sticky, try adding small amounts of flour as you knead until it reaches your desired consistency. Be cautious, as adding too much flour can lead to tough rolls.
Why do my rolls not brown on top?
If your rolls are not browning, you may need to increase the oven temperature or apply an egg wash before baking to promote browning. Additionally, make sure you are using fresh yeast.
How can I tell when my rolls are done baking?
You can tell your rolls are finished baking by tapping the bottom; if it sounds hollow, they are ready. Alternatively, check for a golden brown crust on top.
Is it normal for my rolls to deflate after baking?
Deflation can occur if the rolls over-proof or if they are handled roughly before baking. Ensure that you handle the dough gently and monitor the rising times closely.
Conclusion
Making fluffy dinner rolls from scratch is a rewarding experience that will impress any dinner guest. By carefully following the outlined steps and understanding the science behind the ingredients, you’ll have deliciously soft rolls every time.
Experimenting with flavors, such as adding herbs, cheeses, or even sweet additions, can make your rolls versatile for any occasion. Enjoy the process, and watch your cooking skills grow with each batch!
Recipe Card
Mastering Fluffy Dinner Rolls at Home
Ingredients
- 4 cups all-purpose flour
- 2 tablespoons sugar
- 1 tablespoon instant yeast
- 1 teaspoon salt
- 1 cup warm milk
- 1/4 cup unsalted butter melted
- 1 large egg
Instructions
- Combine dry ingredients.
- Mix wet ingredients.
- Combine wet and dry mixtures.
- Knead the dough.
- First rise.
- Shape the rolls.
- Second rise.
- Preheat the oven.
- Bake the rolls.
- Cool and serve.
Notes
Additional serving suggestions: pair with a crisp salad, garlic bread, or roasted seasonal vegetables for balance.
For make-ahead, prep components separately and assemble just before heating to preserve texture.
Taste and adjust with acid (lemon/vinegar) and salt right at the end to wake up flavors.