Introduction
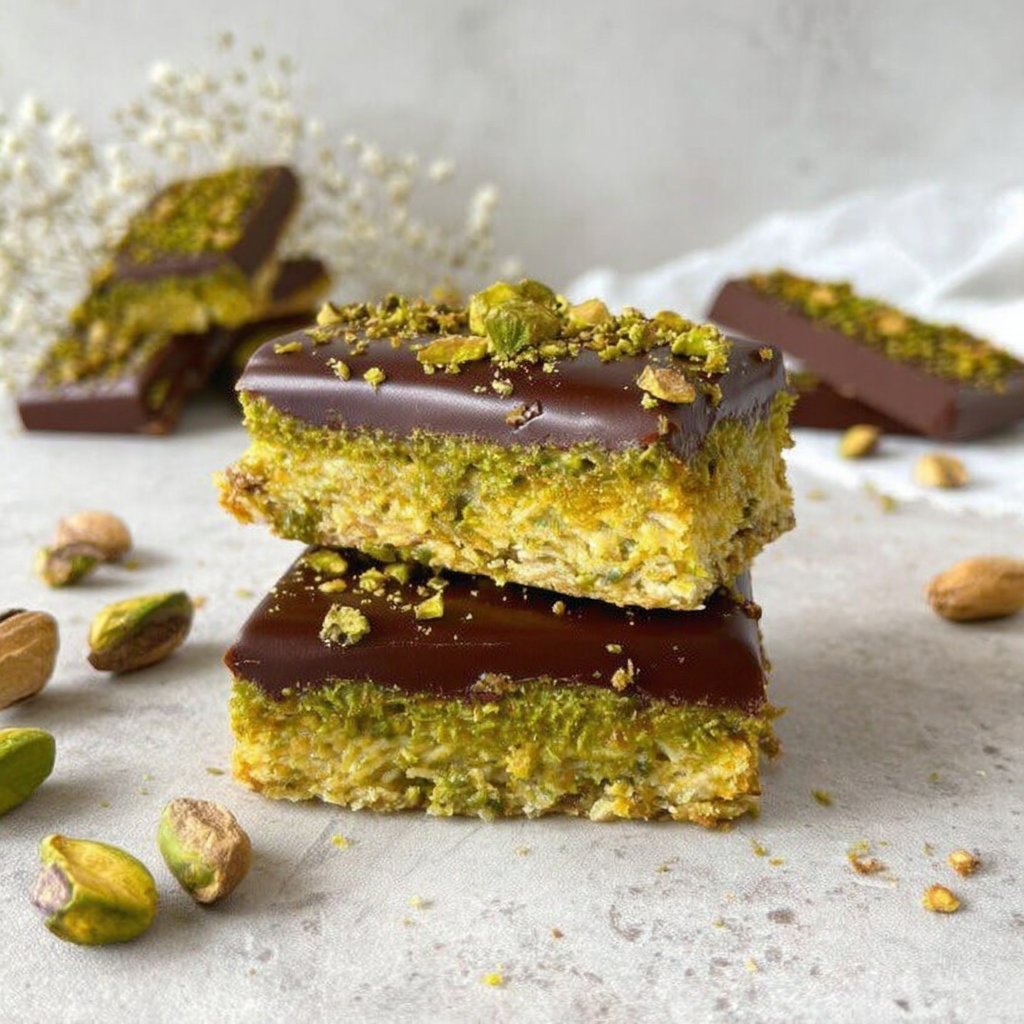
Imagine a luxurious dessert that elegantly combines the unique texture of kataifi pastry with the rich flavors of chocolate and the crunch of pistachios. This Pistachio Kataifi Chocolate Bar is not just a treat; it’s an experience that allows home cooks to showcase their creativity in the kitchen.
This recipe features layers of flaky kataifi, enveloping a creamy chocolate filling and crunchy pistachios, creating a delightful contrast in every bite. It’s a celebration of flavors that is perfect for any occasion, whether you're hosting a dinner party or seeking a special indulgence for yourself.
Ingredients
- 200g kataifi pastry
This pastry provides a distinctively flaky texture that is essential for the layered structure of the chocolate bar. When baked, kataifi turns golden and crispy, creating a deliciously crunchy base. - 100g unsalted butter, melted
Butter enriches the pastry, ensuring that it remains moist and flavorful. It also helps in browning the kataifi, resulting in that enticing golden hue. - 200g dark chocolate (70% cocoa)
Dark chocolate is key for achieving a rich and intense flavor profile. Its slight bitterness balances perfectly with the sweetness of the other ingredients. - 100g heavy cream
The cream lends a luscious mouthfeel to the chocolate filling. It aids in making the chocolate smooth and glossy, enhancing richness that complements the crunch of kataifi. - 100g pistachios, shelled and chopped
Pistachios offer a delightful crunch and a nutty flavor that contrasts well with the sweetness of chocolate. They also add a hint of color, elevating the visual appeal of the dessert. - 50g powdered sugar
Powdered sugar sweetens the chocolate filling and helps achieve a smooth texture. It may also be used for dusting the finished bars for a beautiful presentation. - A pinch of sea salt
Salt heightens the flavors of the chocolate and pistachios, creating a more rounded taste profile that brings out the best in each ingredient.
Directions & Preparation
Step 1: Preheat your oven to 350°F (175°C).
Preheating the oven ensures that the kataifi pastry cooks evenly and develops a crispy texture. Skipping this step can lead to uneven cooking, with some parts becoming soggy instead of crisp.
Step 2: Prepare a baking dish by greasing it lightly with butter.
Greasing the baking dish helps prevent the kataifi from sticking, ensuring it comes out easily once baked. This step is crucial for maintaining the shape and integrity of your chocolate bar.
Step 3: Unwrap the kataifi and gently loosen the strands with your fingers.
Loosening the kataifi is important for creating that airy, flaky texture. If the strands are clumped together, the resulting texture may be dense instead of light and crispy.
Step 4: Mix the kataifi with melted butter in a large bowl until well-coated.
Coating the kataifi with melted butter is essential for achieving a golden, crispy texture. This mixture will act as the base for your dessert, and even distribution is key for uniform cooking.
Step 5: Press half of the kataifi mixture into the bottom of the prepared baking dish.
Pressing down the kataifi helps form a solid layer that will hold the chocolate filling. This step sets the foundation, so it’s important to compact it evenly to avoid cracking after baking.
Step 6: Bake for 15-20 minutes until golden brown, then remove from the oven.
Baking until golden brown will enhance the flavor of the kataifi, giving it a toasted taste that complements the chocolate. Watch closely to prevent burning, as baking times can vary by oven.
Step 7: While the kataifi is baking, prepare the chocolate filling. Heat heavy cream in a pot until it simmers gently.
Gently heating the cream helps to melt the chocolate more effectively without seizing, which ensures a smooth filling. Avoid boiling to prevent the cream from curdling.
Step 8: Remove the pot from heat and add chopped dark chocolate, stirring until smooth.
Stirring the chocolate into the hot cream creates a silky ganache. Ensuring no lumps remain is crucial, as a smooth texture will improve the overall experience of the chocolate bar.
Step 9: Fold in the chopped pistachios and a pinch of sea salt into the melted chocolate mixture.
Incorporating pistachios at this stage ensures they’re evenly distributed throughout the filling. The sea salt enhances the flavors, balancing the sweetness of the chocolate with a savory hint.
Step 10: Pour the chocolate filling over the baked kataifi crust, spreading it evenly.
Spreading the filling ensures that each piece of the final chocolate bar has an adequate amount of filling. It helps in achieving a uniform taste, making every bite delightful.
Step 11: Top with the remaining kataifi mixture, pressing gently to adhere.
Topping with more kataifi adds a crispy layer that contrasts nicely with the soft chocolate filling. Pressing it gently helps it bond together, enhancing the structural integrity.
Step 12: Bake again for an additional 10-15 minutes until the top is golden brown.
This second bake allows the top kataifi to develop a crunchy texture, while the filling continues to set. Ensure not to overbake, as the chocolate could become overly firm.
Step 13: Let the bar cool completely in the pan before slicing it into squares or bars.
Cooling in the pan allows the filling to firm up, making it easier to slice without compromising the layers. Patience is key here; cutting too soon can lead to a messy presentation.
Step 14: Dust with powdered sugar before serving for an elegant finish.
Dusting with powdered sugar not only adds a touch of sweetness but also enhances the visual appeal. It highlights the layers and provides a beautiful contrast against the golden kataifi.

Unlocking the Secrets of Kataifi Texture
Kataifi pastry is a unique ingredient made of thin strands that, when treated with care, provide an extraordinary crispness and lightness. The key to achieving the perfect texture lies in the gentle handling of the strands. Allowing them to cool completely will also ensure they retain their structure when you slice into the chocolate bar.
Enhancing Flavor with Quality Chocolate
The choice of chocolate is pivotal in this recipe. Opting for high-quality dark chocolate ensures a rich flavor that complements the sweetness of the filling. Look for chocolate with a higher cocoa content for depth; it will enhance the overall profile of the dessert, allowing it to shine in every bite.
Elevating with Pistachios: A Spectrum of Nutty Goodness
Pistachios not only provide texture but also infuse the dessert with a wonderfully nutty flavor. Toasting the pistachios before adding them can intensify their flavor, making every bite more aromatic and flavorful. Additionally, their vibrant green color adds visual appeal, making this dessert just as beautiful as it is delicious.
FAQs
What can I do if my chocolate filling is too thick?
If the chocolate filling is too thick, try gently reheating it while stirring in a bit more warmed heavy cream. This will help restore a smoother consistency.
How can I make this recipe nut-free?
To make this recipe nut-free, simply omit the pistachios and replace them with seeds such as sunflower seeds or pumpkin seeds for a similar crunchy texture without the nuts.
Why did my kataifi become soggy?
Sogginess in kataifi can result from not baking it long enough in the first step or from excessive moisture in the filling. Always ensure to bake until golden.
What is the best way to achieve even slices?
For even slices, use a sharp knife and run it through hot water before cutting. Wiping the knife between cuts can also help maintain clean edges.
Can I use different chocolate types for the filling?
Yes, you can use milk or white chocolate instead. Just remember that the sweetness level will change, so adjust powdered sugar accordingly.
Is there a way to make the bars more chocolatey?
For an extra chocolatey taste, consider adding cocoa powder to the katifi mixture or drizzle melted chocolate on top before serving.
Conclusion
Creating a Pistachio Kataifi Chocolate Bar is a rewarding venture that showcases a medley of flavors and textures. As you merge the delicate, crispy kataifi with rich chocolate and crunchy pistachios, you're not just making food; you're creating a memorable experience.
With each indulgent bite, you bring a taste of luxury to your home kitchen, impressing both yourself and those who share in this delightful treat. This recipe invites you to indulge your culinary creativity, and the rewards are delicious.
Recipe Card

Delightful Pistachio Kataifi Chocolate Bar Creation
Ingredients
- 200 g kataifi pastry
- 100 g unsalted butter melted
- 200 g dark chocolate 70% cocoa
- 100 g heavy cream
- 100 g pistachios shelled and chopped
- 50 g powdered sugar
- A pinch of sea salt
Instructions
- Preheat your oven to 350°F (175°C).
- Prepare a baking dish by greasing it lightly with butter.
- Unwrap the kataifi and gently loosen the strands with your fingers.
- Mix the kataifi with melted butter in a large bowl until well-coated.
- Press half of the kataifi mixture into the bottom of the prepared baking dish.
- Bake for 15-20 minutes until golden brown, then remove from the oven.
- While the kataifi is baking, prepare the chocolate filling. Heat heavy cream in a pot until it simmers gently.
- Remove the pot from heat and add chopped dark chocolate, stirring until smooth.
- Fold in the chopped pistachios and a pinch of sea salt into the melted chocolate mixture.
- Pour the chocolate filling over the baked kataifi crust, spreading it evenly.
- Top with the remaining kataifi mixture, pressing gently to adhere.
- Bake again for an additional 10-15 minutes until the top is golden brown.
- Let the bar cool completely in the pan before slicing it into squares or bars.
- Dust with powdered sugar before serving for an elegant finish.
Notes
Additional serving suggestions: pair with a crisp salad, garlic bread, or roasted seasonal vegetables for balance.
For make-ahead, prep components separately and assemble just before heating to preserve texture.
Taste and adjust with acid (lemon/vinegar) and salt right at the end to wake up flavors.