Introduction
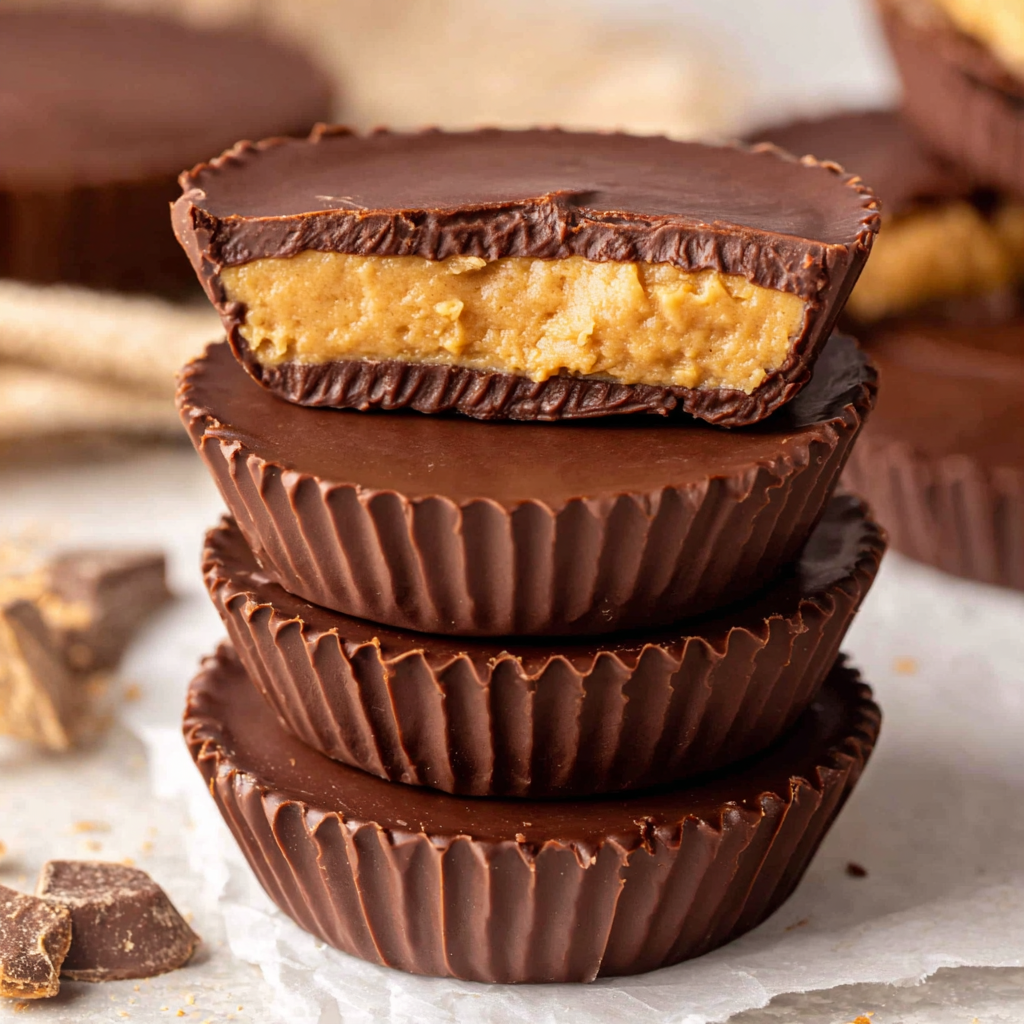
Protein peanut butter cups are the perfect blend of indulgence and nourishment, ideal for a sweet treat that won't derail your healthy eating goals. These delightful morsels offer a satisfying crunch and creamy texture, packed with protein to fuel your day.
With just a few simple ingredients, you can make these delicious cups in no time, perfect for busy individuals looking for a quick snack or a post-workout treat. Let’s dive into the recipe and discover how you can whip up this nutritious delight right in your kitchen.
Ingredients
- 1 cup natural peanut butter
Natural peanut butter provides a rich flavor and is a good source of protein and healthy fats, which help keep you full and satisfied. Using the natural variety ensures that no unnecessary additives or sugars are included. - 1/2 cup protein powder (your choice)
Protein powder adds a powerful boost of protein, aiding in muscle recovery and satiety. Choose a flavor that complements the peanut butter, such as vanilla or chocolate, to enhance the overall taste. - 1/4 cup honey or maple syrup
Sweeteners like honey or maple syrup add sweetness while also contributing moisture to the mixture, allowing for better binding. Both provide natural sugars that give you an energy boost. - 1 cup dark chocolate chips
Dark chocolate chips are perfect for creating a luscious outer layer. They offer a rich taste while delivering antioxidants, making your treat feel indulgent without compromising health. - 1 tablespoon coconut oil
Coconut oil helps to smoothly melt the chocolate, creating a glossy finish. It also enhances the flavor and adds healthy fats that keep the treat satisfying. - Pinch of sea salt (optional)
A pinch of sea salt elevates the flavors, balancing the sweetness and enhancing the nutty profile of the peanut butter. It adds that gourmet touch to this delightful snack.
Directions & Preparation
Step 1: Prepare your molds
Start by preparing your molds, which could be silicone cups or muffin tins lined with cupcake liners. This step is crucial as it ensures easy removal of your peanut butter cups later. If you're using metal tins, lightly grease them to avoid sticking. Taking this precaution will save you from the frustration of crumbling or broken cups during the unmolding process.
Step 2: Melt the chocolate
In a microwave-safe bowl, combine the dark chocolate chips and coconut oil. Heat in 30-second intervals, stirring between each session until smooth. This melting process is important because it creates a thin, pourable chocolate coating. Just be cautious not to overheat the chocolate, as it can become grainy and lose its desirable texture if burned.
Step 3: Pour chocolate into molds
Pour a small amount of the melted chocolate into each mold, just enough to coat the bottom. Using the back of a spoon, spread it evenly to create a base layer. This base layer gives your cups structure and a rich chocolate taste that complements the filling. Allow this layer to set briefly in the refrigerator while you prep the next step.
Step 4: Mix peanut butter filling
In a mixing bowl, combine the peanut butter, protein powder, honey or maple syrup, and a pinch of salt. Stir until you achieve a smooth and creamy consistency. This filling is key as it brings all the flavors together, ensuring each cup has a delectable peanut buttery center. A careful mix ensures that all ingredients are well incorporated, providing even flavor throughout.
Step 5: Add peanut butter filling
Spoon the peanut butter mixture into each mold, filling them about two-thirds full. Press down gently to remove any air pockets. This step is essential for avoiding overly airy cups that crumble when bitten into. The filling should not overflow; make sure to leave room for more chocolate on top.
Step 6: Top with chocolate
Pour more melted chocolate over the peanut butter filling until it is fully covered. Use a spatula to smooth it out, ensuring that no filling is exposed. Covering the filling completely is critical as it seals in the flavors and creates a professional-looking finish. It also protects the filling and keeps it fresh!
Step 7: Chill until firm
Place the filled molds in the refrigerator for about 1-2 hours, or until fully set. The chilling process allows the chocolate to harden completely, making the cups easy to remove. Ensure that they are fully chilled before attempting to remove them from the molds, as this will ensure they hold their shape.
Step 8: Unmold and enjoy
Once set, carefully pop the cups out of the molds. If you used liners, simply peel them away. This step is particularly satisfying as you reveal your homemade delights. They can be enjoyed immediately or stored in an airtight container in the fridge for future indulgence. Try to savor each bite, knowing you've created a healthy yet decadent treat!

Elevate Your Colors with Toppings
Add toppings like crushed nuts, shredded coconut, or sea salt on top of the melted chocolate before chilling. This not only enhances the visual appeal but also adds interesting textures and flavor profiles, making each bite even more delightful. These little extras can turn your protein cups from simple snacks into a gourmet experience!
Experimenting with Flavors
Feel free to get creative by adding different flavorings or mix-ins to the peanut butter filling. Ingredients such as cocoa powder, vanilla extract, or even a pinch of cinnamon can transform the flavor. This versatility ensures that you can tailor each batch to suit your mood or utilize any leftovers you may have on hand, making each treat uniquely yours!
Perfect for Meal Prep
Protein peanut butter cups are an excellent option for meal prepping. By making a batch ahead of time, you can keep nutritious snacks on hand for the week. This convenience supports healthier eating habits, helping you to avoid processed snacks when cravings hit. Store them in an airtight container in the fridge, and you’ll always have a delicious energy boost ready to go!
FAQs
What type of protein powder should I use?
Choose a flavor that complements peanut butter, such as vanilla or chocolate. Ensure it's high-quality with minimal additives.
Can I use a different nut butter?
Yes, almond butter or cashew butter can be used for a unique flavor twist, but may alter the texture slightly.
What do I do if my peanut butter filling is too thick?
If it's too thick, add a bit more honey or a few drops of water or milk to loosen it up. Mix until smooth.
What if my chocolate layer isn't smooth?
If your chocolate seizes or is gritty, try adding a teaspoon of coconut oil and melting it again gently to regain smoothness.
Can I adjust the sweetness in the recipe?
Absolutely! Alter the amount of honey or maple syrup based on your preference. You can also use sugar-free sweeteners.
How can I enhance the chocolate flavor?
Consider adding a tablespoon of cocoa powder or espresso powder to the chocolate before melting to deepen the chocolate flavor.
Conclusion
Making protein peanut butter cups at home is not only rewarding but also a delightful way to enjoy a healthier treat. With simple ingredients and easy preparation, you can create a snack that satisfies both your sweet tooth and your nutritional needs.
These cups can easily fit into your busy lifestyle, making them a wonderful addition to your meal prep routine. So, get creative and personalize your cups to match your taste, ensuring every bite is as enjoyable as it is nutritious.
Recipe Card
Decadent Protein Peanut Butter Cups Made Easy
Ingredients
- 1 cup natural peanut butter
- 1/2 cup protein powder your choice
- 1/4 cup honey or maple syrup
- 1 cup dark chocolate chips
- 1 tablespoon coconut oil
- Pinch of sea salt optional
Instructions
- Prepare your molds
- Melt the chocolate
- Pour chocolate into molds
- Mix peanut butter filling
- Add peanut butter filling
- Top with chocolate
- Chill until firm
- Unmold and enjoy
Notes
Additional serving suggestions: pair with a crisp salad, garlic bread, or roasted seasonal vegetables for balance.
For make-ahead, prep components separately and assemble just before heating to preserve texture.
Taste and adjust with acid (lemon/vinegar) and salt right at the end to wake up flavors.