
Introduction
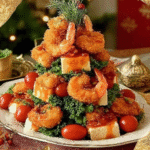
Creating a striking centerpiece for your next gathering can be as enjoyable as it is delicious, and the Shrimp Tree is a wonderful option that delights both the eyes and the palate. This unique presentation combines crunchy breaded shrimp, delectable cubes of cheddar cheese, and vibrant tomatoes, forming a visually stunning tree that is sure to impress your guests.
Whether you’re hosting a holiday party or a casual family dinner, this dish is not only appealing but also easy to assemble. Its components complement each other beautifully, allowing the flavors of the shrimp and cheese to shine alongside the freshness of the tomatoes, making it a balanced appetizer that everyone will love.
Ingredients
- 1 pound large shrimp, peeled and deveined
Shrimp serve as the star of this dish, bringing a sweet and savory seafood flavor that is enhanced by the breading. The succulent texture of the shrimp adds a delightful contrast to the crunchy outer layer. - 1 cup breadcrumbs
Breadcrumbs provide the essential coating that gives the shrimp their crispy exterior. They contribute to the dish's overall texture and help lock in moisture during cooking. - 2 large eggs, beaten
Eggs act as a binding agent, helping the breadcrumbs adhere to the shrimp. This creates a cohesive and uniform coating that crisps up nicely in the oven. - 8 ounces sharp cheddar cheese, cut into cubes
Cheddar cheese adds a creamy richness and bold flavor that balances the lightness of the shrimp. The contrasting textures of melted and cubed cheese provide varied bites. - 1 pint cherry tomatoes, halved
These tomatoes not only introduce a burst of color but also a refreshing acidity that pairs well with the rich flavors of the shrimp and cheese, enhancing the overall taste profile. - 2 tablespoons olive oil
Olive oil helps to lightly coat the breadcrumb mixture, allowing it to brown and crisp during baking. It adds a subtle richness while contributing to the overall flavor. - Salt and pepper to taste
Seasoning is crucial for enhancing the inherent flavors of all the ingredients, ensuring that each bite is satisfying and savory. - Fresh herbs for garnish (optional)
Herbs like parsley or dill can be sprinkled on top for a fresh, aromatic finish that elevates the dish's presentation and flavor.
Directions & Preparation
Step 1: Preheat the oven to 400°F (200°C).
Preheating the oven is a vital step as it ensures that the heat is evenly distributed during cooking, which is crucial for achieving a consistent crispiness in the breaded shrimp. Skipping this step could lead to uneven cooking.
Step 2: Prepare the shrimp by rinsing and patting them dry.
Drying the shrimp removes excess moisture, which could prevent the breading from sticking properly. This step is essential for achieving that desirable crispy texture after baking.
Step 3: In a shallow dish, set up your breading station: place the breadcrumbs in one dish, and the beaten eggs in another.
Creating a breading station helps streamline the breading process and ensures that each shrimp is coated evenly. This organized setup minimizes mess and makes the cooking experience more enjoyable.
Step 4: Season the shrimp with salt and pepper before dipping.
Seasoning the shrimp directly contributes to the flavor profile right from the start. A light sprinkle of salt and pepper helps enhance the natural sweetness of the shrimp.
Step 5: Dip each shrimp into the beaten eggs and then into the breadcrumbs, pressing gently to adhere the crumbs.
This step is key in building the crispy layer around the shrimp. Ensuring a good coating of breadcrumbs not only enhances texture but also adds flavor, creating a satisfying crunch.
Step 6: Place the breaded shrimp on a baking sheet lined with parchment paper, making sure they are evenly spaced.
Even spacing allows for proper airflow and even cooking of the shrimp. Overcrowding the pan can result in steaming rather than crisping, so give each shrimp room to breathe.
Step 7: Drizzle olive oil over the breaded shrimp before baking.
Adding a drizzle of olive oil helps the breadcrumbs toast and turn golden brown, enhancing the crispy texture while adding flavor. This final touch elevates the entire dish.
Step 8: Bake the shrimp in the preheated oven for 12-15 minutes until golden and cooked through.
Baking at the right temperature ensures that the shrimp cook quickly without becoming rubbery. Checking for that golden color and perfect cooking time prevents overcooking, maintaining juiciness.
Step 9: While the shrimp bakes, prepare the cheese and tomatoes.
Preparing the cheese and tomatoes while the shrimp cooks maximizes efficiency in the kitchen. The cheese and tomatoes will become a delightful topping that pairs perfectly with the shrimp.
Step 10: Once the shrimp are done, remove them from the oven and let them cool slightly before assembling the tree.
Cooling slightly makes the shrimp easier to handle without burning your fingers. This brief resting allows the flavors to settle and prepares them for presentation.
Step 11: On a platter, start assembling the shrimp vertically by skewering them onto wooden skewers or a large serving stick, alternating with cheesy cubes and tomatoes.
The construction of the tree shape is not only visually appealing but also ensures a blend of flavors in each bite. Alternating ingredients creates a balanced presentation and enhances the tasting experience.
Step 12: Garnish with fresh herbs, if desired, and serve immediately.
A final sprinkle of fresh herbs not only adds color but also introduces a fresh burst of flavor that complements the rich shrimp and cheese. Serving immediately ensures that everything is warm and inviting.

The Art of Presentation: Making Your Shrimp Tree Shine
A beautiful presentation elevates any dish, and the Shrimp Tree is no exception. To make your shrimp tree as visually appealing as it is delicious, consider using a large platter or serving board that allows ample space for the skewers to stand upright. Arrange the shrimp, cheese, and tomatoes strategically, allowing colors to contrast and inviting guests to take a closer look.
Pairing Flavors: Wine Suggestions for Your Shrimp Tree
When it comes to pairing wine with this delightful dish, opt for a crisp white wine like Sauvignon Blanc or a light-bodied rosé. These options complement the briny nature of shrimp and balance the richness of cheddar cheese. Ensure the wine is served chilled for a refreshing sip that perfectly enhances the flavors of your shrimp tree.
Creative Variations: Customize Your Shrimp Tree
While the classic shrimp, cheddar, and tomato combination is a winning choice, feel free to get creative with your Shrimp Tree. Consider incorporating different cheeses, like pepper jack for a spicy kick, or adding vegetables such as bell peppers or olives for extra flavor and color. Tailoring the ingredients to your tastes can transform this dish into a personal favorite.
FAQs
What can I do if my breading isn't sticking to the shrimp?
If your breadcrumbs aren't adhering well, ensure the shrimp are properly dried before dipping them into the egg wash. A light press into the breadcrumbs can also help create a better bond.
How do I make my Shrimp Tree more flavorful?
Incorporate additional flavors such as garlic powder or paprika into the breadcrumb mixture. Marinating shrimp in lemon juice and herbs prior to breading can also enhance flavor.
Can I use frozen shrimp for this recipe?
Yes, you can use frozen shrimp. Just make sure to thaw them completely and pat them dry before proceeding with the recipe to avoid excess moisture.
Why is my shrimp rubbery after baking?
Rubbery shrimp are often a result of overcooking. Keep an eye on your shrimp in the oven; they should be just opaque and firm to the touch when done.
What if I don’t have fresh herbs for garnish?
If fresh herbs aren’t available, consider using a sprinkle of dried herbs, like basil or oregano, to add flavor. A dash of lemon zest can also brighten the dish.
How can I scale the recipe for a larger group?
To scale up the recipe, simply multiply the ingredient quantities by the number of servings you need. Make sure to use larger skewers or multiple platters for assembly.
Conclusion
The Shrimp Tree with breaded shrimp, cheddar cubes, and tomatoes is more than just a dish; it's an experience. Its unique presentation and harmonious flavors will undoubtedly make it a highlight at your next gathering, impressing your guests and igniting their curiosity.
Encouraging creativity in the kitchen, this adaptable recipe allows for personalization while maintaining its delicious core. So gather your ingredients, unleash your culinary talents, and enjoy the praises that come from sharing this delightful dish.
Recipe Card
Delightful Shrimp Tree with Cheddar and Tomatoes
Ingredients
- 1 pound large shrimp peeled and deveined
- 1 cup breadcrumbs
- 2 large eggs beaten
- 8 ounces sharp cheddar cheese cut into cubes
- 1 pint cherry tomatoes halved
- 2 tablespoons olive oil
- Salt and pepper to taste
- Fresh herbs for garnish optional
Instructions
- Preheat the oven to 400°F (200°C).
- Prepare the shrimp by rinsing and patting them dry.
- In a shallow dish, set up your breading station: place the breadcrumbs in one dish, and the beaten eggs in another.
- Season the shrimp with salt and pepper before dipping.
- Dip each shrimp into the beaten eggs and then into the breadcrumbs, pressing gently to adhere the crumbs.
- Place the breaded shrimp on a baking sheet lined with parchment paper, making sure they are evenly spaced.
- Drizzle olive oil over the breaded shrimp before baking.
- Bake the shrimp in the preheated oven for 12-15 minutes until golden and cooked through.
- While the shrimp bakes, prepare the cheese and tomatoes.
- Once the shrimp are done, remove them from the oven and let them cool slightly before assembling the tree.
- On a platter, start assembling the shrimp vertically by skewering them onto wooden skewers or a large serving stick, alternating with cheesy cubes and tomatoes.
- Garnish with fresh herbs, if desired, and serve immediately.
Notes
Additional serving suggestions: pair with a crisp salad, garlic bread, or roasted seasonal vegetables for balance.
For make-ahead, prep components separately and assemble just before heating to preserve texture.
Taste and adjust with acid (lemon/vinegar) and salt right at the end to wake up flavors.