
Introduction
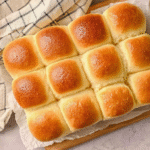
There's something incredibly satisfying about the aroma of fresh bread wafting through your kitchen. Fluffy bread rolls, in particular, are a comforting staple that can elevate any meal or stand alone as a delightful snack.
Bread rolls are versatile and can be adapted to suit any occasion, from a family dinner to festive gatherings. Understanding the key ingredients and techniques can help you achieve that perfect texture and flavor.
Ingredients
- 4 cups all-purpose flour
All-purpose flour provides the structure for the rolls, allowing them to rise properly while maintaining a soft crumb. Its balanced protein content contributes to the bread’s chewiness without making it tough. - 1 packet (2 1/4 tsp) instant yeast
Instant yeast is used to help the dough rise quickly and efficiently, creating those lovely airy pockets within the rolls. It activates immediately when mixed with dry ingredients, making your prep quicker. - 1 cup warm milk
Warm milk adds moisture to the dough and helps create a rich flavor. The warmth also activates the yeast, providing an optimal environment for fermentation and development of the rolls' fluffiness. - 1/4 cup unsalted butter, melted
Melted butter enriches the dough, leading to softer rolls with a delicious flavor. It also contributes to the overall tenderness, preventing the bread from drying out during baking. - 1/4 cup granulated sugar
Sugar acts as food for the yeast and contributes to browning during baking. It balances the savory elements and helps to create a slightly sweet, tender roll. - 1 tsp salt
Salt is crucial for flavor and also strengthens the gluten structure of the dough, ensuring the rolls hold their shape while baking. - 1 large egg
The egg contributes richness and moisture, enhancing the structure of the rolls. It also helps with browning, giving the rolls an appealing golden hue.
Directions & Preparation
Step 1: Combine dry ingredients in a bowl
Start by mixing the all-purpose flour, instant yeast, sugar, and salt in a large bowl. This step is critical because it ensures that the yeast and salt don't come into direct contact, which can inhibit the yeast's effectiveness. Mixing these dry ingredients allows for even distribution of yeast and enhances the fermentation process.
Step 2: Warm the milk and add melted butter and egg
In a separate bowl, mix warm milk, melted butter, and beaten egg. The warmth of the milk facilitates yeast activation and the overall rising process. Additionally, incorporating the butter and egg at this stage ensures they blend well into the dough, creating a smooth and cohesive mixture.
Step 3: Combine wet and dry mixtures
Pour the wet mixture into the dry ingredients and stir until a shaggy dough forms. This helps hydrate the flour, activating gluten development for a fluffy texture. Avoid over-mixing at this stage to keep the rolls light and airy.
Step 4: Knead the dough
Transfer the shaggy dough to a floured surface and knead for about 8-10 minutes until smooth and elastic. Kneading develops gluten structure, which traps air bubbles created by the yeast, vital for fluffy rolls. If the dough sticks, add a little more flour but be careful not to overdo it.
Step 5: Let the dough rise
Place the kneaded dough in a greased bowl and cover it with a damp cloth. Allow it to rise in a warm place for about 1 to 1.5 hours, or until doubled in size. This fermentation process is crucial as it allows the dough to gain volume and flavor.
Step 6: Shape the rolls
After rising, punch down the dough to release excess air and divide it into equal pieces, roughly the size of golf balls. Shape each piece into a round ball by tucking the edges under. Proper shaping helps create surface tension, which is essential for even rising and a nice top crust.
Step 7: Second rise
Place the shaped rolls on a greased baking sheet, leaving space between them, and cover with a cloth. Let them rise again for about 30-45 minutes. This second rise is crucial for achieving the light and fluffy texture, as it allows the yeast to continue its action.
Step 8: Preheat the oven
While the rolls are rising, preheat your oven to 375°F (190°C). A properly preheated oven allows the rolls to bake evenly, ensuring a beautifully browned exterior while maintaining a soft interior.
Step 9: Bake the rolls
Once risen, bake the rolls in the preheated oven for 12-15 minutes or until they are golden brown. The baking process firms up the structure and develops flavor through the Maillard reaction, resulting in a deliciously crusty exterior.
Step 10: Cool before serving
Once baked, remove the rolls from the oven and let them cool on a wire rack. Cooling allows steam to escape, preventing the rolls from becoming soggy. Enjoy them warm, fresh out of the oven, or at room temperature.

Troubleshooting Common Issues with Dough
Many home bakers encounter challenges when making fluffy bread rolls, such as overly sticky dough or irregular shapes. If your dough is too sticky, gradually add flour during kneading until a smooth texture is reached. If shaping is difficult, ensure the dough has risen adequately, as this makes it easier to handle and shape. Patience during the rising periods ensures better dough consistency.
Creative Add-ins for Enhanced Flavor
Fluffy bread rolls can be further enhanced by adding herbs, spices, or cheeses into the dough. Mixing in garlic powder, cheddar cheese, or rosemary creates a delicious twist. You can also sprinkle toppings like sesame seeds or everything bagel seasoning for added crunch and flavor. Just remember that any add-ins should not overwhelm the dough’s ability to rise.
Serving Suggestions for Perfect Rolls
These light and fluffy bread rolls are incredibly versatile and can complement a wide range of meals. Serve them alongside soups or stews for a comforting pairing or use them as sliders for your favorite sandwiches. They can also be enjoyed simply with butter or jam, making them perfect for breakfast or snacks, appealing to both adults and children.
FAQs
What should I do if my dough doesn’t rise?
If your dough doesn't rise, double-check the freshness of your yeast. If expired, it won’t activate. Ensure the environment is warm enough, as yeast thrives in heat.
How can I make my bread rolls even fluffier?
For fluffier rolls, ensure you knead the dough properly to develop gluten structure, and don’t skip the second rise, which helps improve texture.
My rolls turned out too dense. What happened?
Dense rolls may result from under-kneading or not allowing enough time for the dough to rise. Always give the dough sufficient rise time to achieve a light texture.
Can I substitute whole wheat flour for all-purpose flour?
Yes, you can substitute whole wheat flour, but reduce the amount slightly as it is denser. You may need to increase the liquid in the dough to maintain hydration.
What can I do to prevent overbaking?
To prevent overbaking, keep an eye on the rolls as they bake, using a timer. When they turn golden brown and sound hollow when tapped, they're done.
Can I flavor the dough with herbs?
Absolutely! Add fresh or dried herbs like rosemary or thyme during the mixing phase to infuse the rolls with delightful flavors.
Conclusion
Making fluffy bread rolls at home is a rewarding experience that enhances any meal. With a bit of patience and attention to detail, your kitchen can be filled with the warm fragrances of freshly baked bread.
Enjoy experimenting with different flavors, shapes, and serving styles to truly make these rolls your own. Whether served warm at dinner or as part of a snack, these rolls are sure to impress.
Recipe Card
Creating Light and Fluffy Bread Rolls at Home
Ingredients
- 4 cups all-purpose flour
- 1 packet 2 1/4 tsp active dry yeast
- 1 1/2 cups warm milk
- 1/4 cup granulated sugar
- 1/4 cup unsalted butter melted
- 1 tsp salt
- 2 large eggs
Instructions
- Activate the yeast
- Mix the dry ingredients
- Combine wet and dry components
- Knead the dough
- First rise
- Shape the rolls
- Second rise
- Preheat the oven
- Bake
- Cool and serve
Notes
Additional serving suggestions: pair with a crisp salad, garlic bread, or roasted seasonal vegetables for balance.
For make-ahead, prep components separately and assemble just before heating to preserve texture.
Taste and adjust with acid (lemon/vinegar) and salt right at the end to wake up flavors.