
Introduction
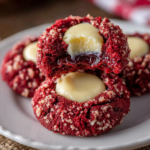
Red velvet treats are undeniably enchanting, combining a rich chocolate flavor with the striking visual appeal of vibrant red. Among these delightful desserts, soft and chewy red velvet thumbprint cookies stand out. They not only capture the eye but also deliver a plush texture in every bite.
Perfect for special occasions or just a cozy evening at home, these cookies are fun to make and even more enjoyable to eat. The chocolate and vanilla flavors harmonize beautifully, especially when paired with a luscious cream cheese filling that sits in the thumbprint.
Ingredients
- 2 ½ cups all-purpose flour
All-purpose flour forms the base of the cookies, providing structure and stability. The right amount is crucial as too much can lead to dry cookies, while too little may result in cookies that spread too much. - ¼ cup unsweetened cocoa powder
Cocoa powder adds a rich chocolate flavor while enhancing the deep red color of the cookies. It contributes to the overall moisture, ensuring the cookies remain tender. - 1 teaspoon baking soda
Baking soda is a leavening agent that helps the cookies rise slightly, creating a tender texture. It activates with the acidity of other ingredients, like buttermilk, providing a light crumb. - ½ teaspoon salt
Salt enhances the sweetness and balances flavors, making the overall taste more vibrant. It’s essential to draw out the depth of chocolate flavor without making the cookies overly salty. - 1 cup unsalted butter, softened
Butter is key for creating a rich, tender cookie texture. It helps with flavor and contributes to the overall chewiness. Make sure it’s softened to ensure it mixes well with the sugar. - 1 cup granulated sugar
Granulated sugar adds sweetness and also helps to create a crispy exterior while keeping the inside chewy. The amount of sugar directly impacts the cookie texture. - 1 large egg
Eggs provide moisture and help bind the ingredients together, contributing to the cookies' structure. It also adds richness to the flavor. - 1 teaspoon vanilla extract
Vanilla extract complements the cocoa and enhances overall flavor depth. It serves to round out the taste, making each bite more harmonious. - ½ cup buttermilk
Buttermilk adds acidity which reacts with the baking soda to help the cookies rise. It also contributes to the cookies' softness and adds a slight tang that balances the sweetness. - Red food coloring (gel preferred)
Food coloring is essential to achieve the iconic vibrant red hue of red velvet cookies. Using gel helps to avoid adding extra liquid to the dough. - Cream cheese frosting for filling
Cream cheese frosting is a classic accompaniment that adds creamy richness and tangy flavor to the thumbprint cookies. It contrasts beautifully with the sweetness of the cookie itself.
Directions & Preparation
Step 1: Preheat your oven to 350°F (175°C).
Preheating your oven ensures that the cookies bake evenly and achieve the desired texture. A hot oven will set the edges of the cookies more quickly, helping to retain a chewy center.
Step 2: In a mixing bowl, cream together the softened butter and granulated sugar until light and fluffy.
This step is crucial for incorporating air into the mixture, leading to a lighter cookie. Creaming also melts some of the sugar, which contributes to the chewyness of the cookie. Use an electric mixer to ensure it's thorough and consistent.
Step 3: Add the egg, vanilla extract, and food coloring to the butter-sugar mixture and mix until combined.
Incorporating these ingredients at this stage ensures an even distribution of color and flavor throughout the cookies. The food coloring should be mixed thoroughly to achieve a bold red color.
Step 4: In a separate bowl, whisk together the all-purpose flour, cocoa powder, baking soda, and salt.
Whisking these dry ingredients separately allows for even distribution of the leavening agent and cocoa, ensuring consistent flavor and texture throughout the cookie dough.
Step 5: Gradually add the dry ingredients to the wet mixture, alternating with buttermilk, and mix until just combined.
Alternating between dry and wet ingredients helps prevent overmixing, which can lead to tough cookies. Mixing until just combined keeps the dough tender and light.
Step 6: Scoop out tablespoon-sized portions of the dough and roll them into balls.
Rolling the dough into balls ensures uniform sizes, which promotes even baking. The specified portion size also contributes to the chewy texture, as larger cookies may bake unevenly.
Step 7: Place the dough balls on a prepared baking sheet, leaving enough space between each cookie.
Spacing is important as the cookies will spread during baking. Too close together may lead to merged cookies that lose their distinct thumbprint shape.
Step 8: Use your thumb or the back of a spoon to create an indentation in the center of each cookie before baking.
Creating a thumbprint before baking allows the cookies to retain their shape and have a place for the cream cheese frosting later. This step is key to achieving that classic thumbprint look.
Step 9: Bake for 10-12 minutes, or until the edges are set but the centers still look slightly soft.
Baking until just set ensures the centers remain chewy while the edges take on a gentle crisp. Overbaking can lead to dry cookies, so monitor the cookies closely during the final minutes.
Step 10: Remove from the oven and let cool completely before frosting the centers with cream cheese frosting.
Cooling before frosting prevents the frosting from melting into the cookies. This step is vital for maintaining the distinct thumbprint filled with frosting, highlighting the flavors.

Choosing the Right Food Coloring for Impact
Opt for gel food coloring instead of liquid for vivid color without altering the dough's consistency. Liquid food coloring can add too much moisture, potentially affecting the texture. Gel provides a more concentrated hue, ensuring the classic red velvet look.
Applying the Cream Cheese Frosting Beautifully
When filling the thumbprint with cream cheese frosting, consider using a piping bag for a precise application. This not only creates a visually appealing look but also ensures even distribution of frosting in each indentation, enhancing the overall flavor experience.
Experimenting with Flavor Twists
Feel free to experiment with flavors in the frosting or the cookie dough itself. Adding a hint of almond extract to the frosting, or incorporating mini chocolate chips into the dough, can elevate your cookies and personalize them to your taste preferences.
FAQs
What if my dough is too thick?
If your dough is too thick, try adding a tablespoon of buttermilk at a time until the desired consistency is reached. The dough should be pliable but not overly sticky or runny.
How can I make these cookies less sweet?
To reduce sweetness, try decreasing the amount of sugar by ¼ cup, or consider using less cream cheese frosting on top. You can also add a pinch more salt to balance the flavors.
What should I do if my cookies spread too much while baking?
If your cookies spread excessively, ensure you are using the right flour measurement and chilling the dough for about 30 minutes before baking can help solidify the butter, preventing too much spreading.
Can I add nuts or chocolate chips to these cookies?
Yes! Feel free to fold in some chopped nuts or chocolate chips into the dough before rolling. They can provide a nice texture contrast and additional flavor to the cookies.
Why do my cookies turn out dry?
Overbaking is the most common cause of dry cookies. Ensure to check for doneness at the lower end of the baking time and remember that cookies will set slightly after they are removed from the oven.
Can I use a different filling instead of cream cheese frosting?
Yes, you can substitute the cream cheese frosting with chocolate ganache or flavored buttercream if desired. Just be sure the filling complements the red velvet flavor.
Conclusion
Soft and chewy red velvet thumbprint cookies are a delightful treat that add a splash of color to any gathering. Their rich flavor paired with the creamy frosting creates a perfect balance in every bite.
Whether enjoyed with a cup of tea or presented as part of a festive dessert table, these cookies are sure to impress. So roll up your sleeves and let your creativity shine with this charming recipe.
Recipe Card
Decadent Soft & Chewy Red Velvet Thumbprint Cookies
Ingredients
- 2 ½ cups all-purpose flour
- ¼ cup unsweetened cocoa powder
- 1 teaspoon baking soda
- ½ teaspoon salt
- 1 cup unsalted butter softened
- 1 cup granulated sugar
- 1 large egg
- 1 teaspoon vanilla extract
- ½ cup buttermilk
- Red food coloring gel preferred
- Cream cheese frosting for filling
Instructions
- Preheat your oven to 350°F (175°C).
- In a mixing bowl, cream together the softened butter and granulated sugar until light and fluffy.
- Add the egg, vanilla extract, and food coloring to the butter-sugar mixture and mix until combined.
- In a separate bowl, whisk together the all-purpose flour, cocoa powder, baking soda, and salt.
- Gradually add the dry ingredients to the wet mixture, alternating with buttermilk, and mix until just combined.
- Scoop out tablespoon-sized portions of the dough and roll them into balls.
- Place the dough balls on a prepared baking sheet, leaving enough space between each cookie.
- Use your thumb or the back of a spoon to create an indentation in the center of each cookie before baking.
- Bake for 10-12 minutes, or until the edges are set but the centers still look slightly soft.
- Remove from the oven and let cool completely before frosting the centers with cream cheese frosting.
Notes
Additional serving suggestions: pair with a crisp salad, garlic bread, or roasted seasonal vegetables for balance.
For make-ahead, prep components separately and assemble just before heating to preserve texture.
Taste and adjust with acid (lemon/vinegar) and salt right at the end to wake up flavors.