Introduction
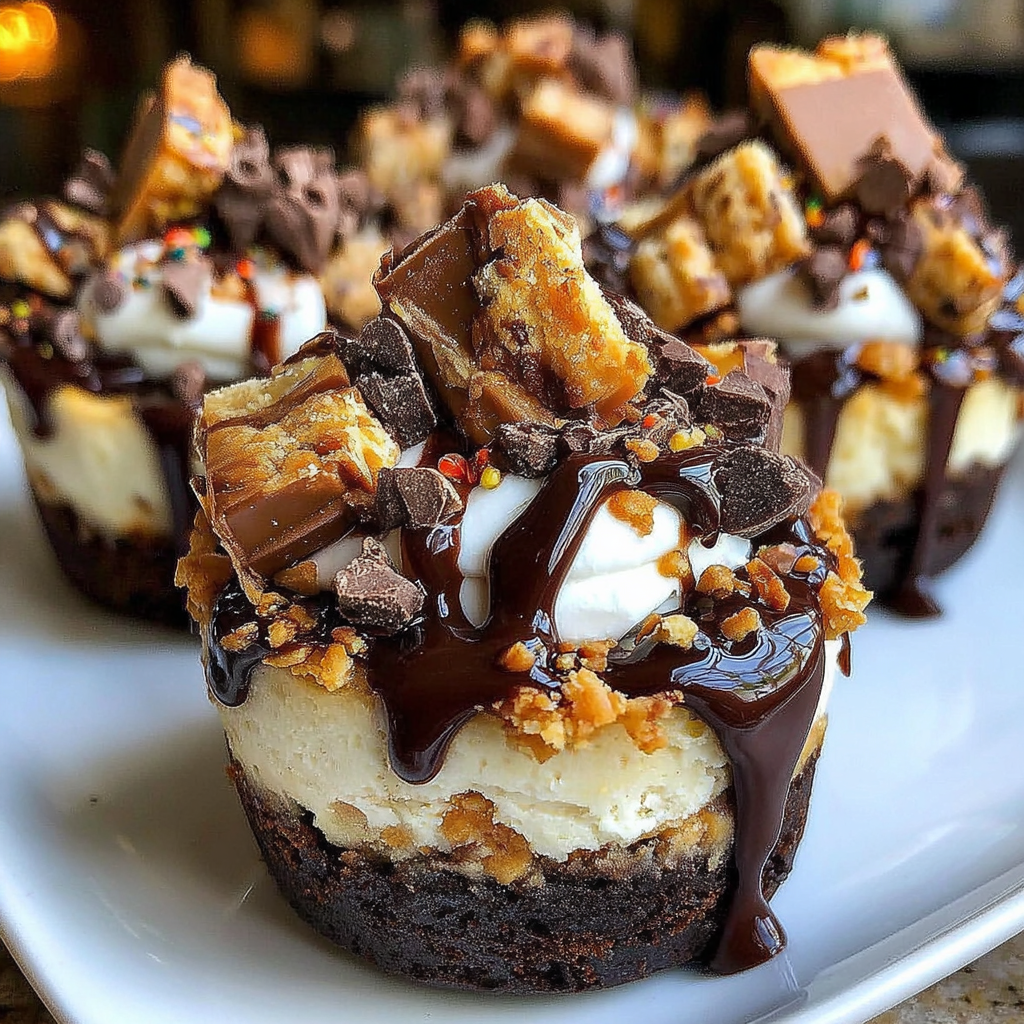
Indulge in a delightful blend of textures and flavors with loaded brownie cheesecake cups. These little desserts bring together the rich, fudgy goodness of brownies and the creamy smoothness of cheesecake, all packed into an easy-to-handle cup. They're perfect for entertaining or simply satisfying a sweet craving at home.
What sets these treats apart is their versatility. You can customize them with your favorite toppings, whether that's a drizzle of chocolate, a sprinkle of nuts, or a dollop of whipped cream. The best part? They’re as simple to prepare as they are fun to share.
With each bite, you’ll experience the deep chocolate flavor of the brownie paired with the velvety cheesecake, creating a truly decadent dessert. Grab your ingredients and let’s dive into the world of loaded brownie cheesecake cups!
Ingredients
- 1 cup unsalted butter, melted
The melted butter adds richness and moisture to both the brownie and cheesecake layers, helping to create a fudgy brownie base that is essential for the dessert's structure. - 2 cups granulated sugar
Sugar not only sweetens the dish but also plays a crucial role in the texture of the brownie and cheesecake, contributing to that delightful, slightly chewy brownie crust. - 4 large eggs
Eggs provide structure and stability to the brownie and cheesecake layers. They also help in achieving a light, airy texture in the cheesecake filling. - 1 cup all-purpose flour
Flour forms the base of the brownie layer, helping it hold together while keeping it dense and chewy compared to other cake styles. - 1 cup unsweetened cocoa powder
Cocoa powder brings rich chocolate flavor to the brownies, contributing to the deep color and taste that complements the creaminess of the cheesecake. - 1 teaspoon vanilla extract
Vanilla enhances the overall flavor profile of the dessert, balancing the sweetness with a hint of warmth and depth. - 8 ounces cream cheese, softened
The cream cheese forms the base of the cheesecake layer, providing a creamy texture and a slightly tangy flavor that contrasts beautifully with the sweet brownie. - 1/2 cup sour cream
Sour cream adds creaminess and a touch of acidity to the cheesecake, helping to enrich the flavor while keeping the filling smooth and luscious. - 1/4 cup powdered sugar
Powdered sugar sweetens the cheesecake without adding graininess, ensuring a smooth, creamy filling that melds perfectly with the brownie. - 1/2 cup chopped nuts (optional)
Adding chopped nuts introduces a delightful crunch to the dessert, enhancing the texture and bringing an extra layer of flavor. - Chocolate chips (for topping, optional)
Chocolate chips can be sprinkled on top to add an extra chocolatey element, improving both the look and richness of the finished cups.
Directions & Preparation
Step 1: Preheat your oven to 350°F (175°C). Prepare a muffin tin with cupcake liners.
Preheating the oven is crucial for achieving the right texture in your brownie cups. Lining a muffin tin with cupcake liners ensures an easy release after baking, making cleanup a breeze.
Step 2: In a large bowl, mix melted butter and granulated sugar until well combined.
Mixing these two ingredients thoroughly helps dissolve the sugar, ensuring a uniform sweetness and texture in the brownie base. This creates the necessary moisture needed for fudgy brownies.
Step 3: Add eggs one at a time, beating well after each addition. Stir in the vanilla extract.
Incorporating the eggs gradually allows for better aeration, making the brownies lighter while maintaining a rich texture. The vanilla enhances the flavor profile significantly, creating more depth.
Step 4: Sift in the flour and cocoa powder, folding gently until just combined.
Sifting the dry ingredients prevents clumps and ensures even mixing. Folding in the dry ingredients carefully helps retain air from the eggs, vital for a light brownie texture.
Step 5: Divide the brownie batter evenly among the lined muffin cups, filling each about halfway.
Filling only halfway allows enough space for the cheesecake layer, preventing overflowing during baking. This ensures balanced portions that are easy to enjoy.
Step 6: In a separate bowl, beat the softened cream cheese until smooth, then add sour cream and powdered sugar.
Beating the cream cheese separately creates a smoother cheesecake filling. Combining it with sour cream adds creaminess, while the powdered sugar sweetens and contributes to the structure.
Step 7: Spoon the cheesecake mixture over the brownie batter, filling each cup to the top.
Layering the cheesecake filling on top of the brownie batter creates beautiful swirls and layers. It’s important to fill each cup evenly for consistent baking and presentation.
Step 8: If desired, sprinkle with chocolate chips and chopped nuts before baking.
Adding chocolate chips and nuts can take your dessert to the next level. The chocolate melts into the filling, creating a gooey texture, while the nuts add crunch.
Step 9: Bake for 20-25 minutes, or until the edges are set but the centers are slightly soft.
Baking until the edges are firm while keeping the centers soft will yield that perfect chewy brownie texture with a luscious cheesecake top. Watch closely, as overbaking can lead to dryness.
Step 10: Let cool in the pan for 10 minutes, then transfer to a wire rack to cool completely.
Allowing the cups to cool gradually prevents cracking and ensures that they set properly. Removing them too soon can result in collapsed centers or broken cups.
Step 11: Chill in the refrigerator for at least an hour before serving for the best texture.
Chilling these cups enhances their flavor melding and solidifies the cheesecake layer. This wait brings out the flavors and improves the overall experience.

The Joy of Layered Textures
The layered nature of loaded brownie cheesecake cups is what makes them so special. Each bite reveals a delectable contrast between the fudgy brownie base and the creamy, rich cheesecake filling. This combination not only provides a delightful mouthfeel but also enhances the overall flavor profile, presenting a new experience with each morsel.
Customization Opportunities
One of the best aspects of these cups is their versatility. You can easily adjust the toppings and mix-ins to match your preferences or seasonal offerings. Try adding fresh fruits like berries, drizzling with caramel, or even using flavored chocolate chips. This adaptability makes loaded brownie cheesecake cups a fun and creative endeavor for home cooks.
Perfect for Any Occasion
These loaded brownie cheesecake cups are perfect for various occasions, from casual family dinners to elegant parties. They can be made ahead of time and are easily transportable. With their attractive presentation and rich flavor, they serve as an impressive dessert that your guests will rave about, making any gathering feel special.
FAQs
What can I do if my brownie cheesecake cups are too thick?
If your batter seems too thick, consider adding a small amount of milk or water gradually to loosen it. This will help achieve the desired consistency without compromising flavor.
How can I adjust the sweetness if it's too bland?
If you find the flavor lacking, try adding a pinch of salt to enhance overall taste, or mix in a little more powdered sugar for sweetness without altering the volume significantly.
Can I make these cups with a different kind of cheese?
Yes, you can experiment with different cream cheeses, like flavored varieties or even mascarpone for a creamier texture. Just ensure that it has a similar fat content.
What should I do if my cheesecake layer is cracking?
If the cheesecake cracks, it may be due to overbaking or sudden cooling. To prevent this next time, avoid overmixing and cool slowly at room temperature before chilling.
What's the best way to remove these from the liners?
Allow them to cool completely to room temperature; this helps ease the unmolding process. Use a small offset spatula to gently lift the edges if needed.
Can I use gluten-free flour instead of regular flour?
Absolutely! Using a gluten-free flour blend can work well, but ensure it's suitable for baking to maintain texture and structure.
Conclusion
Loaded brownie cheesecake cups are a delightful treat that beautifully marry two beloved desserts in one. Their rich flavors and textures make every bite an indulgent experience, perfect for special occasions or a cozy night in.
By following this recipe, you’ll not only create a dish that's sure to impress but also leave plenty of room for your creativity. Feel free to experiment with toppings and variations, making these cups uniquely yours.
Recipe Card
Delicious Loaded Brownie Cheesecake Cups to Savor
Ingredients
- 1 cup unsalted butter melted
- 2 cups granulated sugar
- 4 large eggs
- 1 cup all-purpose flour
- 1 cup unsweetened cocoa powder
- 1 teaspoon vanilla extract
- 8 ounces cream cheese softened
- 1/2 cup sour cream
- 1/4 cup powdered sugar
- 1/2 cup chopped nuts optional
- Chocolate chips for topping, optional
Instructions
- Preheat your oven to 350°F (175°C). Prepare a muffin tin with cupcake liners.
- In a large bowl, mix melted butter and granulated sugar until well combined.
- Add eggs one at a time, beating well after each addition. Stir in the vanilla extract.
- Sift in the flour and cocoa powder, folding gently until just combined.
- Divide the brownie batter evenly among the lined muffin cups, filling each about halfway.
- In a separate bowl, beat the softened cream cheese until smooth, then add sour cream and powdered sugar.
- Spoon the cheesecake mixture over the brownie batter, filling each cup to the top.
- If desired, sprinkle with chocolate chips and chopped nuts before baking.
- Bake for 20-25 minutes, or until the edges are set but the centers are slightly soft.
- Let cool in the pan for 10 minutes, then transfer to a wire rack to cool completely.
- Chill in the refrigerator for at least an hour before serving for the best texture.
Notes
Additional serving suggestions: pair with a crisp salad, garlic bread, or roasted seasonal vegetables for balance.
For make-ahead, prep components separately and assemble just before heating to preserve texture.
Taste and adjust with acid (lemon/vinegar) and salt right at the end to wake up flavors.