Introduction
Garlic bread rolls are a beloved staple in many households, offering a delightful fusion of warm, fluffy bread infused with aromatic garlic and buttery goodness. These rolls not only make a perfect accompaniment to pasta dishes, soups, or salads but can also shine on their own as a delicious snack. Crafting these rolls at home allows you to control the flavors and textures, ensuring they are as comforting as they are delicious.
With their irresistible aroma wafting through the kitchen, homemade garlic bread rolls create an inviting atmosphere that beckons family and friends to gather around the table. Whether served fresh out of the oven or as part of a festive meal, these rolls are bound to leave a lasting impression. Let’s explore the ingredients and steps to craft these fragrant delights that are sure to elevate any dining experience.
Ingredients
- 4 cups all-purpose flour
This flour forms the backbone of the rolls, providing structure and chewiness. Its gluten content helps create that perfect fluffy texture. The flour absorbs moisture and aids in rising when combined with yeast. - 2 teaspoons active dry yeast
Yeast is the leavening agent that helps the dough rise. It ferments the sugars in the dough, producing carbon dioxide that causes the dough to expand, resulting in light and airy rolls. - 1 cup warm water (110°F)
Warm water activates the yeast, dissolving it and allowing it to work effectively. The right temperature is crucial; too hot can kill the yeast, while too cold can slow its activation. - 2 tablespoons sugar
Sugar serves as food for the yeast, helping it to ferment and rise. Additionally, it adds a touch of sweetness that enhances the overall flavor profile of the rolls. - 1 teaspoon salt
Salt is essential for flavor and controls yeast activity. It strengthens the dough, contributing to the rolls' overall texture and taste, balancing the rich garlic flavors. - 1/2 cup unsalted butter (melted)
Butter enriches the dough, providing moisture and a rich flavor. Brushing melted butter on top before baking gives a beautifully golden finish and a savory aroma. - 6 cloves garlic (minced)
Garlic infuses the rolls with its distinct flavor, becoming pleasantly caramelized during the baking process. It adds a robust depth of taste, making these rolls sing with savory goodness. - 1/4 cup fresh parsley (chopped, optional)
Fresh parsley not only enhances the visual appeal of the rolls but also adds a fresh, herbal note that complements the garlic beautifully. It brightens the flavor profile.
Directions & Preparation
Step 1: Activate the yeast by combining warm water, sugar, and yeast in a bowl. Let it sit for 5-10 minutes until bubbly.
This first step is crucial for ensuring your yeast is alive and active. If the mixture becomes frothy, it indicates that the yeast is ready to work, providing the ideal environment for your dough to rise. If no bubbles form, you may need to start over with newer yeast.
Step 2: In a large mixing bowl, combine flour and salt. Make a well in the center and add the yeast mixture and melted butter.
Combining the flour and salt upfront prevents direct contact of salt with yeast, ensuring a successful rise. The well helps introduce liquids into the dry ingredients gradually, aiding in the formation of a cohesive dough.
Step 3: Stir the mixture until a sticky dough forms, then knead it on a floured surface for about 8-10 minutes until smooth.
Kneading develops gluten, creating a stretchy and elastic dough. Don’t skimp on this step; proper kneading gives the rolls their texture. The dough should feel smooth and slightly tacky—adjust flour if it's too sticky.
Step 4: Place the kneaded dough in a greased bowl, cover it, and let it rise for about 1-1.5 hours until doubled in size.
Allowing the dough to rise is essential for creating airy rolls. The warmth and moisture help the yeast produce gases, and the covered bowl traps heat for a consistent environment. Timing may vary based on room temperature.
Step 5: While the dough rises, prepare the garlic butter mixture by combining melted butter, minced garlic, and chopped parsley in a bowl.
This garlic butter infuses the rolls with flavor and will be used both in the dough and for brushing on top before baking. The mixture should be well-combined, ensuring the garlic evenly distributes its flavor throughout.
Step 6: Once the dough has risen, punch it down to release excess air, then divide it into 12 equal pieces, shaping each into a roll.
Punching down the dough allows it to relax and prepare for shaping. Shaping into rolls ensures that each piece has an even size for consistent baking. Place the rolls on a greased baking sheet, leaving space for expansion.
Step 7: Cover the shaped rolls with a kitchen towel and let them rise again for about 30-45 minutes until they have puffed up.
This second rise is important for achieving a fluffy texture in the final rolls. Leaving them covered retains moisture, encouraging a light, airy final product. Watch for puffiness to indicate readiness.
Step 8: Preheat the oven to 375°F (190°C) while the rolls rise. Bake the rolls for 15-20 minutes, or until golden and cooked through.
A hot oven is necessary for the rolls to rise quickly and develop a golden crust. Keep an eye on them during baking; overbaking can lead to dry rolls, while underbaking will leave them doughy.
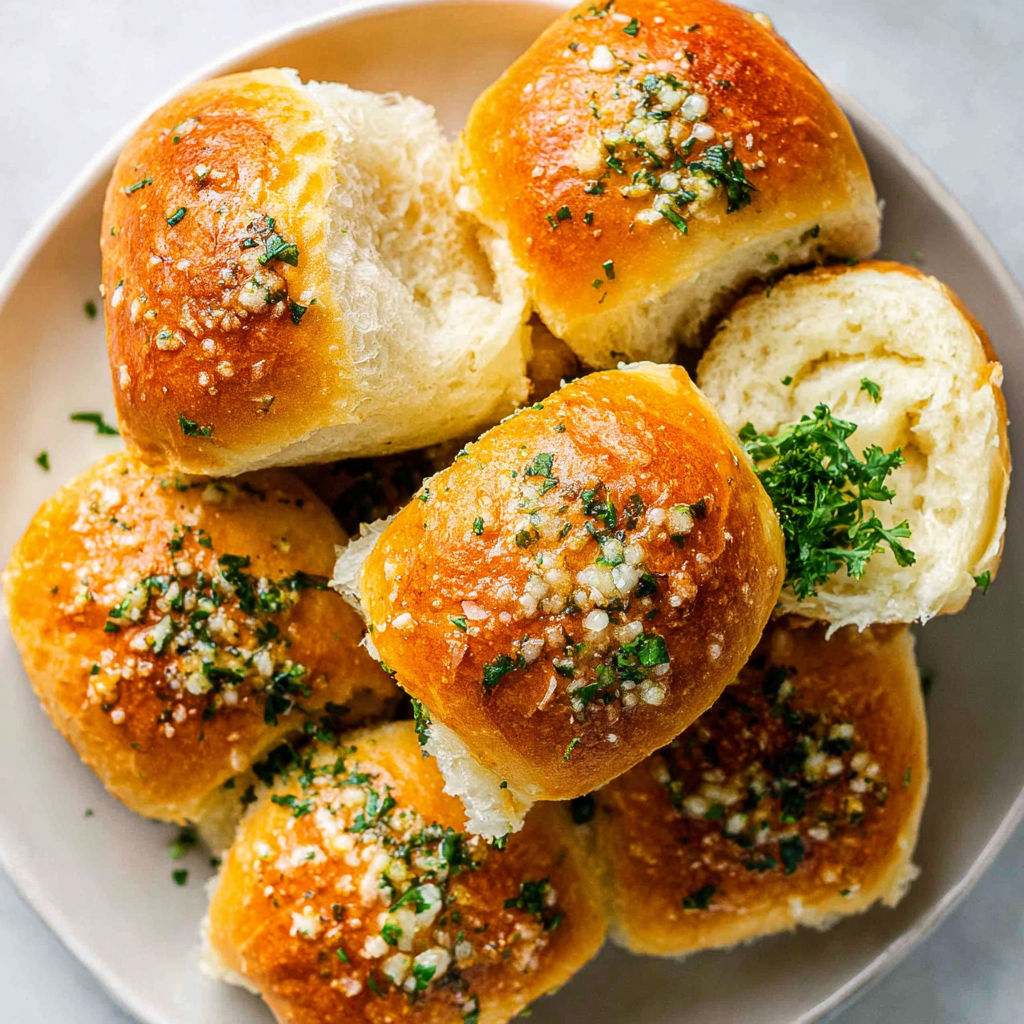
Step 9: Remove from the oven and brush with remaining garlic butter while still warm. Let cool slightly before serving.
Brushing with garlic butter post-baking enhances flavor and adds a shiny finish. The warmth of the rolls helps the butter absorb, ensuring every bite is rich and garlicky. Serve them warm for the best experience.

Creative Variations to Garlic Bread Rolls
While the classic garlic bread rolls are undeniably delicious, consider adding inventive twists to enhance the flavor. Incorporating shredded cheese, such as mozzarella or parmesan, into the dough offers a melty surprise that complements the garlic beautifully. Additionally, experimenting with spices like red pepper flakes or Italian herbs can give these rolls a delightful kick or diverse flavors that cater to various palates.
Perfect Pairings for Your Rolls
Garlic bread rolls complement a variety of dishes, making them versatile additions to any meal. Pair them with rich, hearty pasta dishes like spaghetti carbonara or creamy fettuccine Alfredo that benefit from the rolls' absorbent texture. For a lighter option, serve alongside a fresh garden salad or a flavorful soup, like minestrone, where the rolls can soak up the savory broth, enhancing the overall dining experience.
Achieving the Ideal Texture
The texture of homemade garlic bread rolls is pivotal to their appeal. Ensuring the right amount of kneading and fermentation during the rising phase imparts a light and fluffy quality to each bite. Pay attention to dough consistency during each stage; it should be slightly tacky yet manageable. If the dough feels overly dry or wet at any stage, adjusting the flour or water can make a significant difference in achieving that coveted roll texture.
FAQs
What if my dough doesn't rise properly?
If your dough doesn't rise, it could be due to inactive yeast or insufficient warmth. Ensure your yeast is fresh and activate it correctly. If the dough is in a cold environment, move it to a warmer spot to encourage rising.
How can I scale this recipe for a smaller batch?
To scale this recipe, simply divide each ingredient by the number of servings you wish to make, maintaining the same ratios. For example, halving the recipe would involve using 2 cups of flour and corresponding reductions for the other ingredients.
What can I do if the garlic flavor is too overwhelming?
If the garlic flavor is too strong, reduce the amount of minced garlic in the butter mixture. You can also incorporate more butter or even cheese to balance the flavors, creating a richer taste without the garlic overpowering.
Why did my rolls turn out too dense?
Dense rolls may result from under-kneading or not allowing for adequate rising time. Ensure you knead the dough until it is smooth and elastic, and give it enough time to rise until it has doubled in size.
Can I use different herbs in my rolls?
Absolutely! Fresh or dried herbs like rosemary, thyme, or oregano can add unique flavors to your garlic bread rolls. Incorporate them into the dough or sprinkle them on top before baking for added depth.
What if my dough is too sticky to handle?
If your dough is too sticky, it may need a bit more flour. Incorporate it gradually until the dough reaches a manageable consistency. Avoid adding too much flour too quickly, as it can lead to tough rolls.
Conclusion
Homemade garlic bread rolls are a simple yet rewarding project for any home cook, bringing warmth and comfort to your dining experience. With their enticing aroma and tender texture, these rolls can elevate any meal, leaving a delightful impression on your guests.
Don't hesitate to experiment with flavors and variations to suit your taste. Whether enjoyed solo or as part of a larger feast, these rolls are bound to become a favorite in your kitchen, offering a delectable way to enjoy the magic of garlic bread.
Recipe Card

Delicious Homemade Garlic Bread Rolls That Impress
Ingredients
- 4 cups all-purpose flour
- 2 teaspoons active dry yeast
- 1 cup warm water 110°F
- 2 tablespoons sugar
- 1 teaspoon salt
- 1/2 cup unsalted butter melted
- 6 cloves garlic minced
- 1/4 cup fresh parsley chopped, optional
Instructions
- Activate the yeast by combining warm water, sugar, and yeast in a bowl. Let it sit for 5-10 minutes until bubbly.
- In a large mixing bowl, combine flour and salt. Make a well in the center and add the yeast mixture and melted butter.
- Stir the mixture until a sticky dough forms, then knead it on a floured surface for about 8-10 minutes until smooth.
- Place the kneaded dough in a greased bowl, cover it, and let it rise for about 1-1.5 hours until doubled in size.
- While the dough rises, prepare the garlic butter mixture by combining melted butter, minced garlic, and chopped parsley in a bowl.
- Once the dough has risen, punch it down to release excess air, then divide it into 12 equal pieces, shaping each into a roll.
- Cover the shaped rolls with a kitchen towel and let them rise again for about 30-45 minutes until they have puffed up.
- Preheat the oven to 375°F (190°C) while the rolls rise. Bake the rolls for 15-20 minutes, or until golden and cooked through.
- Remove from the oven and brush with remaining garlic butter while still warm. Let cool slightly before serving.
Notes
Additional serving suggestions: pair with a crisp salad, garlic bread, or roasted seasonal vegetables for balance.
For make-ahead, prep components separately and assemble just before heating to preserve texture.
Taste and adjust with acid (lemon/vinegar) and salt right at the end to wake up flavors.